“`html
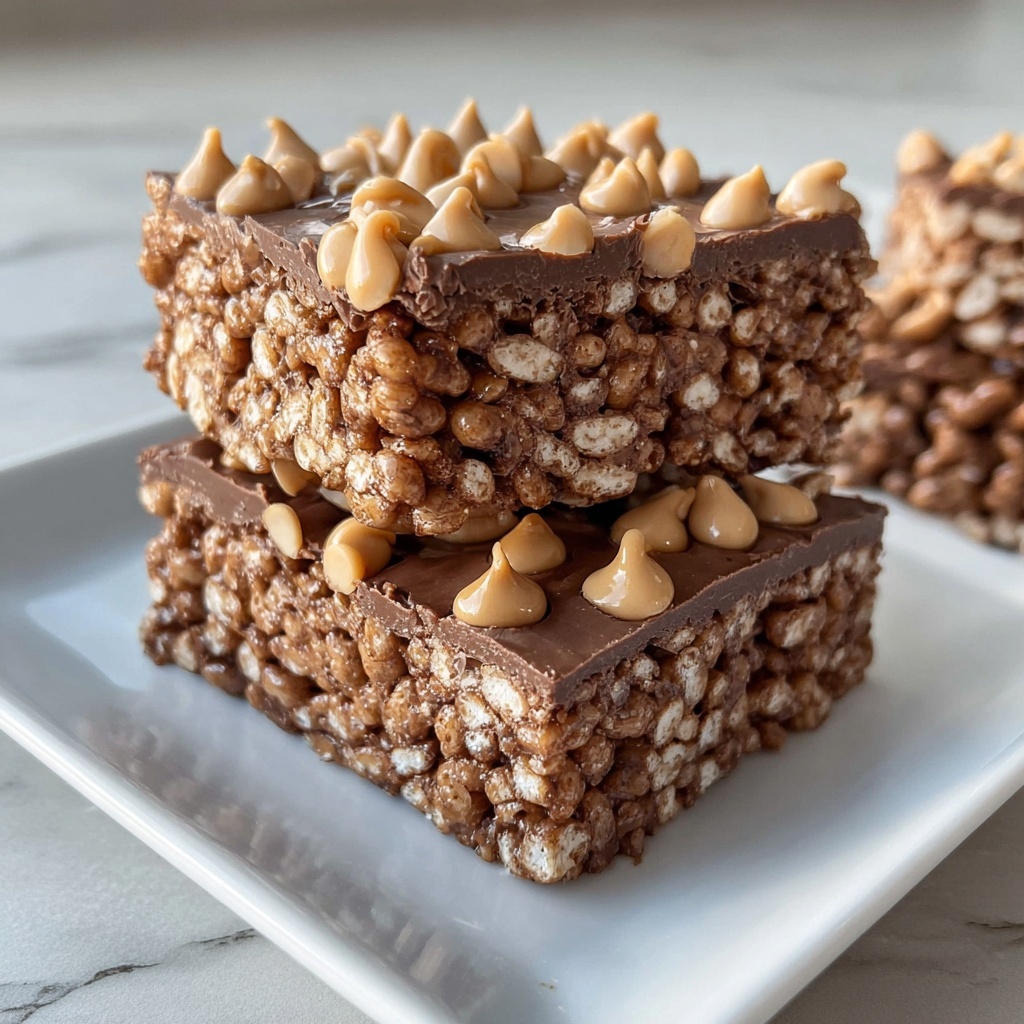
If you have a sweet tooth and love that perfect combination of crispy, chocolatey, and gooey marshmallow goodness, you are going to adore this Homemade Crunch Bars Recipe. It’s the ultimate no-fuss treat that comes together in just a flash and serves up a nostalgic burst of comfort with every bite. Whether you’re making these for a party, a quick snack, or a fun kitchen project, these bars deliver that dreamy crunch and melt-in-your-mouth charm you never knew you needed in your dessert lineup.

Ingredients You’ll Need
These ingredients are simple but essential, each playing a crucial role in delivering the delightful texture and flavor of the bars. From the crispy rice cereal providing the crunch to the luscious chocolate and marshmallow mix that holds everything together, every component elevates this classic treat.
- 3 cups rice cereal: The foundation of the bars, bringing that satisfyingly light crunch in every bite.
- 1 cup chocolate chips (semi-sweet or dark): Adds rich, smooth chocolate flavor that melts into the marshmallows perfectly.
- 4 tablespoons unsalted butter: Helps melt the chocolate and marshmallows into a glossy, irresistible coating.
- 2 cups mini marshmallows: The gooey, sweet binder that creates that classic chewy texture we all crave.
- Optional toppings: nuts or sprinkles: For adding a little personality and crunch on top, if you want to get creative.
How to Make Homemade Crunch Bars Recipe
Step 1: Prepare Your Pan
First things first, grease an 8×8-inch baking dish generously with butter or cooking spray. This ensures your bars won’t stick and makes cleanup a breeze.
Step 2: Melt Butter and Chocolate
In a medium saucepan over low heat, melt together the butter and chocolate chips until you achieve a smooth, glossy mixture. Take your time here—it’s key to getting that perfect, even melt.
Step 3: Combine Marshmallows
Add the mini marshmallows into the warm chocolate mixture and gently stir until they are fully melted and completely combined. You’ll end up with a thick, luscious mixture that binds all the textures wonderfully.
Step 4: Fold in Rice Cereal
Now, gently fold in the rice cereal, making sure every crispy piece is evenly coated with the chocolate-marshmallow blend. The key here is a light hand so the cereal remains crunchy and doesn’t get crushed.
Step 5: Press Into Pan
Pour the mixture into your prepared baking dish. Press it down firmly and evenly using a spatula or your hands (lightly greased to prevent sticking) to create a compact layer that will hold its shape once set.
Step 6: Add Optional Toppings
If you want to dress them up a bit, sprinkle nuts or colorful sprinkles on top while the bars are still warm—before they cool completely—to help the toppings stick beautifully.
Step 7: Chill and Slice
Refrigerate the bars for about 30 minutes until they’re fully set and firm. Once set, slice them into 16 squares and get ready to enjoy that fabulous crunch and chocolaty goodness.
How to Serve Homemade Crunch Bars Recipe
Garnishes
Though these bars are delicious on their own, a light dusting of sea salt flakes or a drizzle of white chocolate can add extra flair and complement the chocolate’s richness beautifully.
Side Dishes
These bars pair wonderfully with a cold glass of milk or a scoop of vanilla ice cream for an indulgent dessert pairing. For a party spread, serve alongside fresh berries to balance their sweetness.
Creative Ways to Present
For a fun twist, cut the bars into mini bite-sized pieces and serve them in colorful cupcake liners. Or, layer them with whipped cream and berries in clear cups for an irresistible parfait presentation that’s sure to impress.
Make Ahead and Storage
Storing Leftovers
Once cooled, store your Homemade Crunch Bars in an airtight container at room temperature. They’ll stay fresh and crunchy for up to 3-4 days, perfect for enjoying throughout the week.
Freezing
If you want to keep them longer, wrap each bar individually in plastic wrap and store them in a freezer-safe container or bag. Frozen, they maintain their flavor and texture well for up to 2 months. Just thaw at room temperature before serving.
Reheating
These bars are best enjoyed at room temperature, but if you prefer a softer, gooey bite, briefly warm a piece in the microwave for about 10-15 seconds. Be careful not to overheat, or the marshmallow could get too sticky.
FAQs
Can I use other cereals besides rice cereal?
Rice cereal is perfect because of its light crunch, but you can experiment with other types like corn flakes or puffed wheat. Just keep in mind that different cereals may change the texture and flavor slightly.
What type of chocolate chips works best in this recipe?
Semi-sweet or dark chocolate chips are ideal for a rich and balanced flavor, but feel free to use milk chocolate if you prefer a sweeter bar. The key is to choose good quality chocolate for the best melt and taste.
Are there any vegan alternatives for this recipe?
Absolutely! Use vegan marshmallows and dairy-free butter along with dairy-free chocolate chips to make a vegan version. The treat will still have that crave-worthy crunch and sweetness.
Can I add mix-ins to the bars?
Yes! Nuts, dried fruit, or even candy pieces make fun add-ins. Just fold them in along with the rice cereal to give your Homemade Crunch Bars Recipe a personalized twist.
How do I get clean-cut bars without crumbling?
Make sure the bars are completely chilled and set before slicing. Using a sharp knife, wipe the blade clean between cuts to get neat squares without crumbs.
Final Thoughts
This Homemade Crunch Bars Recipe is truly a keeper. It’s a wonderfully simple treat that brings back childhood memories and satisfies cravings with its unbeatable texture and flavor combo. Give it a try—you’ll be amazed at how just a handful of ingredients can turn into such a scrumptious, crowd-pleasing delight!
“`
Print
Homemade Crunch Bars Recipe
- Prep Time: 10 minutes
- Cook Time: 10 minutes
- Total Time: 40 minutes
- Yield: 16 servings
- Category: Dessert
- Method: Stovetop
- Cuisine: American
- Diet: Vegetarian
Description
Homemade Crunch Bars combine the classic crunch of rice cereal with a rich, melty chocolate and marshmallow mixture, creating a delightful treat that’s quick and easy to prepare. Perfect for snack time or dessert, these bars are customizable with optional toppings like nuts or sprinkles for an extra touch.
Ingredients
Base Ingredients
- 3 cups rice cereal
- 1 cup chocolate chips (semi-sweet or dark)
- 4 tablespoons unsalted butter
- 2 cups mini marshmallows
Optional Toppings
- Chopped nuts (such as walnuts or almonds)
- Sprinkles
Instructions
- Prepare the baking dish: Grease an 8×8-inch baking dish using butter or cooking spray to ensure the bars do not stick after cooling.
- Melt butter and chocolate: Place a medium saucepan over low heat, add unsalted butter and chocolate chips, stirring continuously until the mixture is smooth and fully melted together.
- Add marshmallows: Stir in mini marshmallows into the chocolate and butter mixture, continuing to stir until the marshmallows are melted completely and integrated into a smooth chocolate-mallow sauce.
- Incorporate rice cereal: Gently fold the rice cereal into the chocolate-marshmallow mixture, mixing until all the cereal is evenly coated and combined.
- Press mixture into dish: Pour the coated mixture into the prepared baking dish. Use a spatula or your hands to press it down firmly and evenly, creating a compact layer for the bars.
- Add toppings (optional): While the mixture is still warm, sprinkle your choice of nuts or sprinkles evenly over the surface, pressing lightly to adhere.
- Chill and set: Place the baking dish in the refrigerator for about 30 minutes to allow the bars to set firmly.
- Slice and serve: Once fully set, remove the bars from the dish and cut into 16 squares. Serve immediately or store in an airtight container.
Notes
- Use semi-sweet or dark chocolate chips for a richer flavor—milk chocolate will make a sweeter bar.
- Press the mixture firmly into the pan to ensure bars hold together well without crumbling.
- Customize by adding dried fruit, coconut flakes, or other mix-ins for varied texture and flavors.
- Store bars in an airtight container at room temperature for up to 3 days or refrigerate for longer freshness.


