
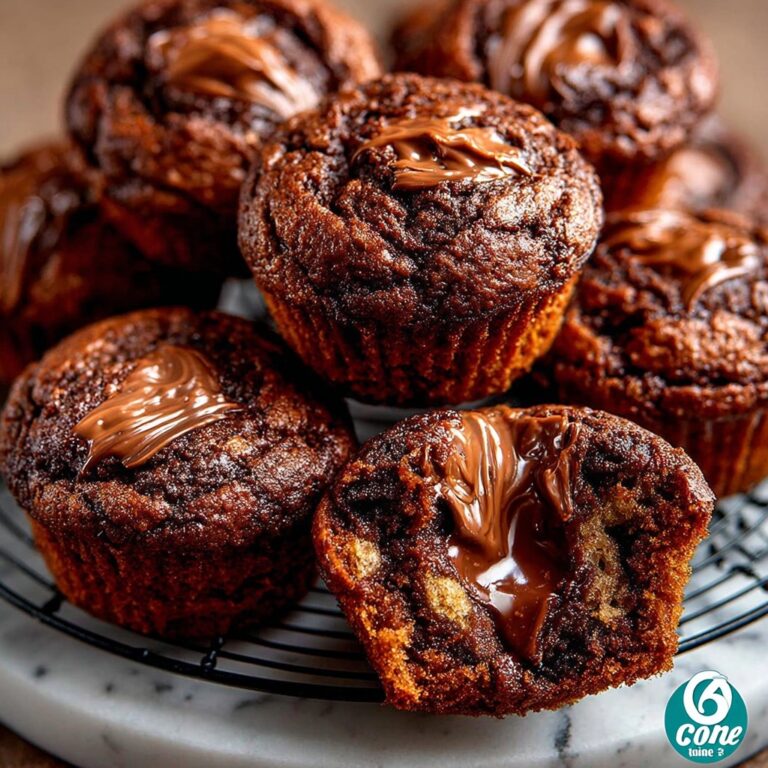
If you’re ready for a dessert experience that combines rich chocolate, delightful caramel, and a crispy cookie texture, then the Twix Cookies and Cream Brownies Recipe is going to be your new obsession. Imagine biting into a fudgy, decadent brownie laced with creamy marshmallows and topped with luscious cocoa icing, joined in perfect harmony by buttery cookies swirled with caramel and milk chocolate. Every bite is a celebration of textures and flavors, delivering sweet satisfaction that’s impossible to resist. Whether you’re sharing with friends or indulging on your own, this recipe is your ticket to chocolate bliss with a fun twist.
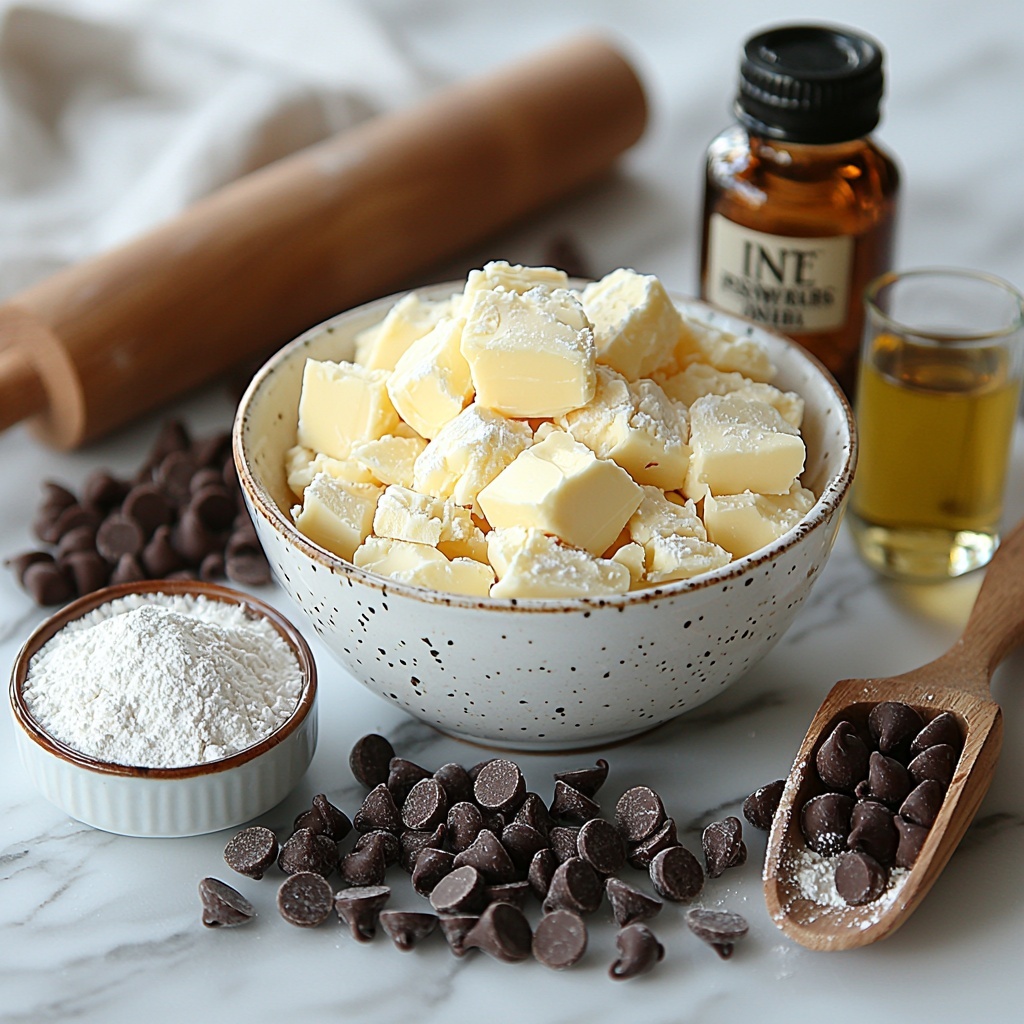
Ingredients You’ll Need
Gathering these straightforward yet essential ingredients is the first step to creating this indulgent treat. Each element plays a crucial role, giving you that perfect brownie richness, cookie crunch, and the sweet, creamy toppings that make this recipe stand out.
- Salted butter: Provides a creamy base and rich flavor essential for brownies and cookies alike.
- Powdered sugar: Adds sweetness and helps create a smooth icing texture.
- Vanilla extract: Infuses warmth and depth into both the cookie and brownie components.
- Baking powder: Gives the cookies just enough lift and tenderness.
- All-purpose flour: The foundation for structure in cookies and brownies, ensuring the perfect crumb and bite.
- Kraft caramel bits or wrapped caramels: The key to that luscious caramel flavor that makes these cookies unforgettable.
- Whole milk: Adds moisture and smoothness throughout the recipe’s elements.
- Salt: Balances sweetness and enhances overall flavor.
- Milk chocolate chips: Creamy chocolate that melts beautifully over the caramel for a dreamy finish.
- Vegetable oil: Helps make the chocolate topping silky and glossy.
- Granulated sugar: Sweetens the brownies and helps create that fudgy texture.
- Canola oil: Adds moisture and tenderness to the brownies.
- Eggs: Bind and enrich the brownie batter.
- Dutch-process cocoa powder: Delivers intense chocolate flavor and enhances the brownies’ deep color.
- Dark or milk chocolate: Chunks folded into the batter create melty pockets of pure bliss.
- Mini marshmallows: Add gooey fun and a delightful chewy contrast on top of the brownies.
- Salted butter for icing: Gives richness and smoothness to the chocolate icing.
- Unsweetened cocoa powder: Adds richness and deep chocolate flavor to the icing.
How to Make Twix Cookies and Cream Brownies Recipe
Step 1: Prepare Your Workspace
First things first, preheat your oven to 350°F and get your baking pans lined and ready. For the brownies, a 9×13-inch pan lined with parchment paper is perfect, while a parchment-lined baking sheet awaits your cookies. This sets the stage for even baking and easy cleanup, so you can focus on the fun part — making magic happen in the kitchen!
Step 2: Craft the Cookie Dough
Using softened salted butter and powdered sugar, cream them together until light and fluffy — this is where your cookies begin to take shape. Next, add vanilla, baking powder, and flour and mix until combined, forming a smooth dough. Wrap it up and chill for one hour to firm it up, making it easier to roll and cut later.
Step 3: Roll and Bake Cookies
Flour your surface and rolling pin generously, then roll the dough out to about ¼-inch thickness. Use a 2½-inch round cookie cutter for evenly sized cookies. Bake them just until they’re set and losing that glossy sheen, about 7 to 10 minutes. Let them cool completely on a wire rack, this is where they just start to transform into buttery, tender delights.
Step 4: Prepare the Caramel Topping
Microwave your caramel bits mixed with milk until smooth and creamy, stirring occasionally. Add a pinch of salt to balance the sweetness. Spoon a teaspoon of this luscious caramel onto each cookie and swirl it gently in a circle, leaving a border to keep things neat. Let the caramel set for about 30 minutes or pop the cookies in the fridge to speed this up.
Step 5: Add the Chocolate Layer
Melt milk chocolate chips and vegetable oil together, making a glossy chocolate coating. Spoon a teaspoon over the caramel on each cookie and swirl again. This two-layer delight mimics a mini Twix bar but with that homemade charm. Allow the chocolate to set fully, refrigerating if you want to get to tasting sooner.
Step 6: Whip Up the Brownie Batter
Melt butter and mix with granulated sugar until smooth and shiny. Add canola oil and vanilla, stir in eggs one at a time, mixing thoroughly after each addition. Sift in flour, cocoa powder, and salt, folding gently until the batter is perfectly blended. Fold in chocolate chunks for pockets of melty goodness.
Step 7: Bake the Brownies
Pour your decadent batter evenly into the prepared pan and sprinkle remaining chocolate chunks on top. Bake for 25 minutes until just set, then scatter mini marshmallows over the surface and return to the oven for an additional 3 minutes. The marshmallows will puff up and become irresistibly gooey.
Step 8: Finish with Chocolate Icing
While the brownies cool a little, melt butter and whisk in powdered sugar and unsweetened cocoa powder. Stir in milk and vanilla for a creamy, glossy icing that you’ll pour right over those gooey marshmallows. Spread evenly and allow the icing to set completely before cutting into squares.
How to Serve Twix Cookies and Cream Brownies Recipe
Garnishes
For an extra special touch, sprinkle a pinch of flaky sea salt over the chocolate topping on the cookies before it sets. This contrast of sweet and salty elevates every bite. On the brownies, a few additional mini marshmallows or chocolate shavings on top just before serving make them look as irresistible as they taste.
Side Dishes
Pair these treats with a scoop of vanilla ice cream or a dollop of whipped cream to balance the intense chocolate and caramel flavors. Fresh berries also work beautifully to cut through the richness and add a fresh, fruity note. For beverages, coffee or a cold glass of milk are classic companions that bring harmony to this dessert symphony.
Creative Ways to Present
Why not surprise your guests by serving the brownies as mini parfaits layered with whipped cream and crushed cookies? Or stack the Twix cookies on a charming dessert platter with edible flowers for a stunning centerpiece. You can even package them individually in pretty boxes for gifts that are as thoughtful as they are delicious.
Make Ahead and Storage
Storing Leftovers
These brownies and cookies keep beautifully in an airtight container at room temperature for up to 4 days. This allows the flavors to mellow and meld, making them even more delightful after a day or two. Just be sure to keep them away from heat or humidity to maintain texture.
Freezing
You can freeze both the cookies and brownies for up to 3 months. Wrap each item tightly in plastic wrap and then foil or place in freezer-safe containers. When you’re ready to enjoy, let them thaw at room temperature for a few hours. This is perfect for preparing in advance for parties or unexpected dessert cravings.
Reheating
To bring back that freshly-baked warmth, microwave individual brownies or cookies for about 15 seconds. This will soften the chocolate and caramel layers, making each bite gooey and heavenly once again. Just be careful not to overheat and melt the toppings beyond deliciousness.
FAQs
Can I use dark chocolate instead of milk chocolate for the cookie topping?
Absolutely! Dark chocolate will add a deeper, slightly bitter flavor that contrasts nicely with the sweetness of the caramel, giving a more grown-up twist to the Twix Cookies and Cream Brownies Recipe.
Do the brownies freeze well after they have been iced?
Yes, you can freeze the brownies after icing. Wrap them carefully to prevent moisture from affecting the icing texture. When thawed, the icing may become a bit softer but will still taste fantastic.
Can I substitute the canola oil with another oil in the brownies?
Certainly, you can use vegetable oil or even light olive oil as substitutes. Just avoid strong-flavored oils that might overpower the chocolatey goodness in the Twix Cookies and Cream Brownies Recipe.
How do I prevent the cookies from spreading too much?
Chilling the cookie dough before rolling and cutting is key to maintaining their shape. Also, make sure your oven temperature is accurate, as lower heat can cause spreading. Following each step carefully helps your cookies look as good as they taste.
What can I do if my caramel topping is too thick?
If the caramel becomes too thick or hard to spread, gently warm it in the microwave in short bursts while stirring until smooth again. Adding a small splash of milk can also help adjust the texture to a spreadable consistency.
Final Thoughts
Now that you’ve discovered the magic that is the Twix Cookies and Cream Brownies Recipe, it’s time to put on your apron and dive right in. This recipe is a true celebration of all things sweet and chocolatey, with layers of flavor that will make your taste buds sing. Whether it’s for a cozy night in or a festive gathering, these treats are sure to bring smiles and joyful moments. So grab those ingredients and start baking — you won’t regret it!
Print
Twix Cookies and Cream Brownies Recipe
- Prep Time: 45 minutes
- Cook Time: 15 minutes
- Total Time: 1 hour
- Yield: 10 cookies
- Category: Dessert
- Method: Baking
- Cuisine: American
Description
Delight in these homemade Twix Cookies that combine a buttery cookie base with rich caramel and smooth milk chocolate topping. Perfectly balanced with a hint of salt, these cookies replicate the beloved candy bar experience in a fun and easy baked treat. With a tender dough, gooey caramel swirl, and luscious chocolate finish, they are an irresistible snack or dessert for any occasion.
Ingredients
Cookie Dough
- ½ cup salted butter (softened)
- ½ cup powdered sugar
- 1 teaspoon vanilla extract
- ½ teaspoon baking powder
- 1 cup all-purpose flour (plus extra for dusting)
Caramel Topping
- 11 ounces Kraft caramel bits (or 1 package of wrapped caramels)
- 1 tablespoon whole milk
- ¼ teaspoon salt
Chocolate Topping
- 1½ cups milk chocolate chips
- 1 teaspoon vegetable oil
Instructions
- Preheat Oven and Prepare Baking Sheet: Preheat your oven to 350°F (175°C) and line a baking sheet with parchment paper to prevent sticking.
- Cream Butter and Sugar: In a stand mixer fitted with a paddle attachment, cream together softened butter and powdered sugar until light and fluffy, ensuring a smooth dough base.
- Mix Dry Ingredients: Add vanilla extract, baking powder, and flour into the creamed mixture. Mix until combined and a dough forms.
- Chill Dough: Shape the dough into a large disc, wrap in plastic wrap, and refrigerate for 1 hour to firm up for easier rolling.
- Roll and Cut Cookies: Lightly flour your countertop and rolling pin, roll the dough to about ¼-inch thickness, then cut into 2½-inch round cookies using a floured cookie cutter.
- Bake Cookies: Place cookies on the prepared sheet and bake for 7 to 10 minutes. Bake until cookies are set and no longer glossy, but avoid browning.
- Cool Cookies: Transfer baked cookies to a wire rack and let cool completely.
- Prepare Caramel Mixture: In a microwave-safe bowl, combine caramel bits with whole milk. Microwave for 1 minute, stir, then heat in 20-second intervals until smooth. Stir in salt to enhance flavor.
- Apply Caramel: Spoon 1 teaspoon of caramel onto each cooled cookie, swirling it into a circle leaving a border. Let it firm at room temperature for about 30 minutes or chill to speed up setting.
- Melt Chocolate: In another microwave-safe bowl, melt the milk chocolate chips and vegetable oil by microwaving in 30-second intervals, stirring in between, until smooth.
- Top with Chocolate: Spoon 1 teaspoon of melted chocolate on each caramel-topped cookie, swirl to mostly cover the caramel leaving the edge visible. Optionally sprinkle flaky salt on top.
- Set and Serve: Allow chocolate to set at room temperature or in the fridge. Once set, enjoy your handmade Twix Cookies!
Notes
- Ensure butter is softened but not melted for best creaming results.
- Do not overbake cookies; they should remain pale to keep a tender texture.
- Flour your rolling surface and cutter generously to prevent sticking without toughening dough.
- Caramel and chocolate layers should be fully set before stacking or storing.
- Store cookies in an airtight container at room temperature or refrigerated to maintain freshness and texture.
- Optionally sprinkle flaky sea salt on chocolate topping to enhance flavor contrast.

