
If you’re craving the perfect game day snack or an irresistible party appetizer, look no further than White Trash Sliders: The Ultimate 15-Minute Beef and Cheese Mini Sandwiches Recipe. These little bundles of savory goodness bring together juicy ground beef, melty cheddar cheese, tangy pickles, and a creamy, flavorful sauce all tucked into soft slider buns. What’s amazing is how quickly you can whip up these sliders without sacrificing any of that bold, comforting flavor that makes them such a crowd-pleaser. They’re ridiculously easy to assemble and baked to golden perfection, making them the ultimate quick fix for any casual gathering or whenever hunger strikes fast!
Ingredients You’ll Need
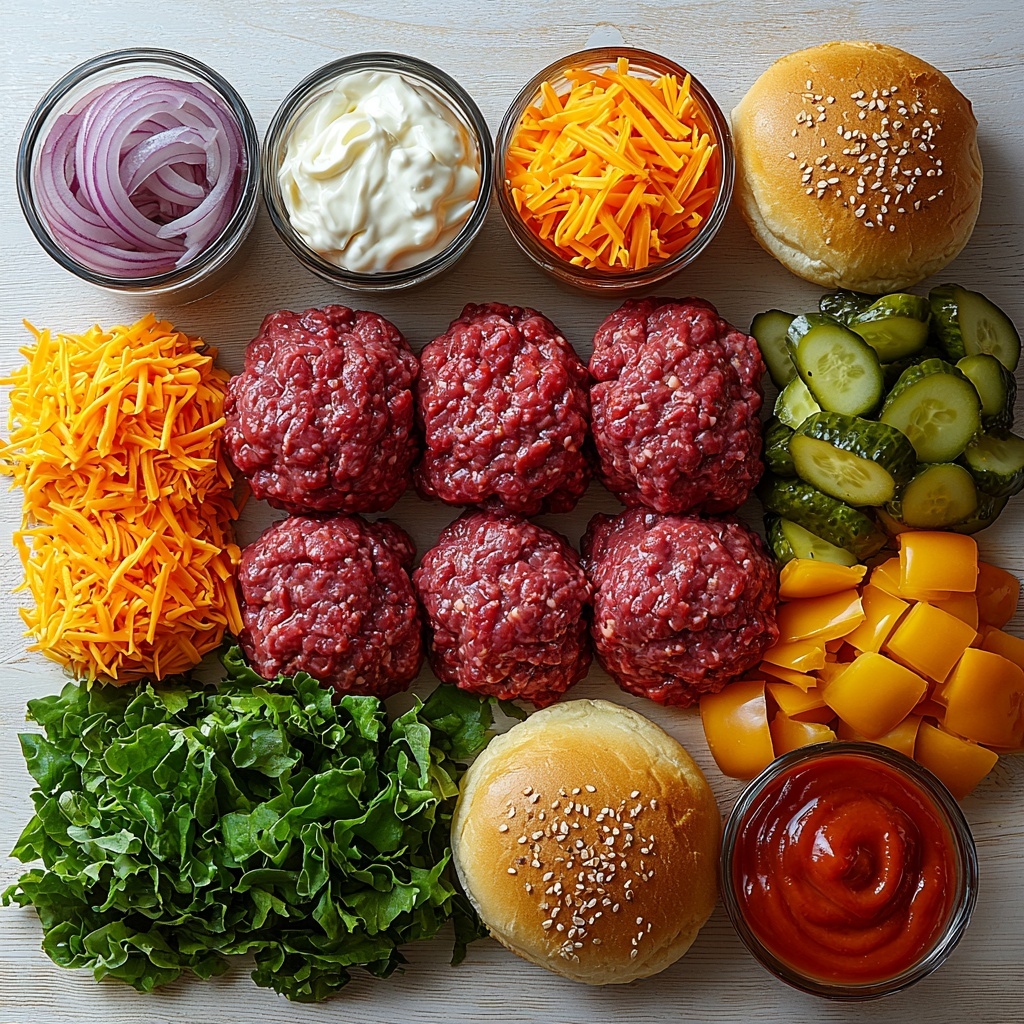
Getting the ingredient list right is essential to bring out the classic flavors of these sliders. Each component plays a key role: from juicy beef providing protein and richness, to cheese adding that gooey, melting texture, and pickles offering a perfect tangy crunch. The sauces blend everything with a smooth, zesty finish, while slider buns make them perfectly handheld and fun.
- 1 pound ground beef: Choose fresh, good-quality beef for juicy burgers that won’t dry out.
- 1 small onion, diced: Adds sweetness and aroma once cooked with the beef.
- 1 cup shredded cheddar cheese: Melts delightfully to create that irresistible cheesy layer inside each slider.
- 1 cup pickles, diced: Provides a crisp and tangy contrast to the rich meat and cheese.
- ½ cup mayonnaise: Brings creaminess and moisture to the mixture, keeping sliders juicy.
- 2 tablespoons mustard: Adds a slight tang and depth of flavor to balance the richness.
- 2 tablespoons ketchup: Infuses some sweetness and a familiar, comforting undertone.
- 1 package (12 count) slider buns: Soft, slightly sweet buns hold everything together perfectly.
- Salt and pepper to taste: Simple seasonings that ensure every bite bursts with flavor.
- Optional: lettuce and tomato for garnish: Fresh toppings that add color and a crisp texture.
How to Make White Trash Sliders: The Ultimate 15-Minute Beef and Cheese Mini Sandwiches Recipe
Step 1: Preheat Your Oven
Start by preheating your oven to 375°F (190°C). This ensures your sliders bake evenly and the buns get that perfect golden crust by the end.
Step 2: Cook the Beef and Onion
In a large skillet over medium heat, cook the ground beef with the diced onion. Stir frequently until the beef is thoroughly browned and the onions turn soft and translucent. This step releases the savory aroma that sets the stage for the rest of the recipe. Don’t forget to drain any excess fat—you want juicy sliders, not greasy ones!
Step 3: Season the Beef
Once cooked, season the beef mixture generously with salt and pepper to elevate the natural flavors. This simple seasoning step is crucial for making the sliders taste balanced and satisfying.
Step 4: Combine the Ingredients
Transfer your seasoned beef mixture into a large bowl. Add the shredded cheddar cheese, diced pickles, mayonnaise, mustard, and ketchup. Stir everything together until the ingredients are evenly combined. This mixture is the heart of your sliders, creating layers of savory, tangy, and creamy flavors all in one bite.
Step 5: Prepare the Slider Buns
Slice your slider buns in half horizontally, taking care to keep the top and bottom parts paired. This will help when filling and assembling, making for easy, neat sandwiches.
Step 6: Assemble the Sliders
Grease a baking dish lightly, then place the bottom halves of the buns in a single layer. Evenly distribute the beef mixture over the bottoms, then cap each with the matching top bun. This assembly method ensures each slider is packed with filling and stays moist after baking.
Step 7: Bake to Perfection
Cover the baking dish with aluminum foil and bake for 15 minutes at 375°F. This initial covered bake infuses warmth and melts the cheese perfectly inside. Then remove the foil and continue to bake for another 5 minutes to crisp up those tops just right. You’ll know they’re done when the buns are golden brown and the cheese is decadently melted.
Step 8: Cool and Slice
Take your sliders out of the oven and allow them to cool for a few minutes. This resting period helps the filling set so the sliders hold their shape when sliced. Slice into individual portions, and you’re ready to serve!
Step 9: Garnish and Enjoy
If you’re in the mood for a fresh touch, add crisp lettuce leaves and juicy tomato slices on top of each slider just before serving. These optional garnishes bring a wonderful punch of freshness that enhances every bite.
How to Serve White Trash Sliders: The Ultimate 15-Minute Beef and Cheese Mini Sandwiches Recipe
Garnishes
A few simple garnishes can elevate your slider experience. Crisp lettuce and sliced ripe tomatoes add a bright, fresh element that balances the richness of the beef and cheese. For a bit of extra flair, try some thinly sliced red onions or even a tangy pickle spear on the side.
Side Dishes
Pair your sliders with classic sides like crispy French fries, crunchy coleslaw, or a vibrant garden salad to round out your meal. Even a bowl of tangy baked beans can complement these sliders beautifully, enhancing the tasty, casual vibe of the dish.
Creative Ways to Present
For parties, arrange your sliders on a large platter lined with parchment paper, making them easy to grab and share. You can also serve them in mini cupcake liners for portion control and a cute presentation. For a fun twist, offer a small station with different toppings and sauces, letting guests customize their own.
Make Ahead and Storage
Storing Leftovers
Once cooled, store any leftover sliders in an airtight container in the refrigerator. They will stay fresh for up to 3 days. Keeping them covered prevents the buns from drying out and preserves that delicious moisture in the filling.
Freezing
If you want to save sliders for later, wrap each one individually in plastic wrap and place them in a freezer-safe bag or container. They freeze well for up to two months, making them a perfect make-ahead snack or quick meal option when time is tight.
Reheating
To enjoy leftovers or thawed frozen sliders, reheat in the oven at 350°F for about 10 minutes. Cover with foil to keep them moist, removing the foil near the end if you want the tops crisped up. Microwaving is possible but may cause the buns to become soggy.
FAQs
Can I use a different type of cheese for these sliders?
Absolutely! While cheddar is classic, feel free to swap in mozzarella, pepper jack, or even a smoky gouda to tailor the sliders to your taste. Each cheese will bring its own unique flavor and melting character.
Are White Trash Sliders suitable for meal prep?
Yes, they’re fantastic for meal prep! You can assemble them ahead of time and refrigerate overnight, then bake fresh when you’re ready. They also freeze well, giving you a quick, delicious option for busy days.
Can I add vegetables to the beef mixture?
Definitely. Diced bell peppers, mushrooms, or even finely chopped spinach can be mixed into the beef for extra nutrition and flavor without compromising the classic slider texture.
What if I don’t have slider buns?
You can get creative if slider buns aren’t handy. Small dinner rolls or mini brioche buns work well as substitutes. Just ensure they’re soft and slightly sweet to complement the flavors.
How spicy are these sliders?
These sliders are mild and approachable in flavor, perfect for all ages. However, you can easily spice things up by adding some hot sauce to the beef mixture or topping the sliders with sliced jalapeños.
Final Thoughts
There’s just something so satisfying about White Trash Sliders: The Ultimate 15-Minute Beef and Cheese Mini Sandwiches Recipe. They combine bold flavors, quick prep, and an effortless assembly that will make you wonder why you haven’t made them sooner. Whether it’s a last-minute get-together or just a comforting dinner at home, these sliders never fail to bring smiles and full plates. Give them a try—you’ll be hooked in no time!
Print
White Trash Sliders: The Ultimate 15-Minute Beef and Cheese Mini Sandwiches Recipe
- Prep Time: 15 minutes
- Cook Time: 15 minutes
- Total Time: 30 minutes
- Yield: 12 sliders
- Category: Appetizer
- Method: Baking
- Cuisine: American
Description
White Trash Sliders are a delicious and easy-to-make party favorite featuring seasoned ground beef mixed with cheddar cheese, pickles, and a tangy mayo-based sauce, all baked inside soft slider buns until golden and bubbly. Perfect for game day or casual gatherings, these sliders offer a comforting blend of creamy, savory, and tangy flavors that will wow your guests.
Ingredients
Slider Filling
- 1 pound ground beef
- 1 small onion, diced
- 1 cup shredded cheddar cheese
- 1 cup pickles, diced
- ½ cup mayonnaise
- 2 tablespoons mustard
- 2 tablespoons ketchup
- Salt and pepper to taste
Slider Buns
- 1 package (12 count) slider buns
Optional Garnish
- Lettuce leaves
- Tomato slices
Instructions
- Preheat Oven: Preheat your oven to 375°F (190°C) to prepare for baking the sliders.
- Cook Beef and Onion: In a large skillet over medium heat, cook the ground beef with diced onion until the beef is fully browned and the onion is soft. Drain excess fat to avoid greasiness.
- Season Beef: Add salt and pepper to taste to season the cooked beef mixture evenly.
- Mix Slider Filling: In a large bowl, combine the cooked beef and onion mixture with shredded cheddar cheese, diced pickles, mayonnaise, mustard, and ketchup. Stir thoroughly until all ingredients are well incorporated.
- Prepare Buns: Slice the slider buns in half horizontally, keeping the top and bottom halves paired together for assembly.
- Assemble Sliders: Arrange the bottom halves of the slider buns in a greased baking dish. Spoon the beef mixture evenly over each bottom bun, then cover them with the corresponding top halves.
- Bake Covered: Cover the baking dish tightly with aluminum foil and bake in the preheated oven for about 15 minutes to heat through and meld flavors.
- Bake Uncovered: Remove the foil and continue baking for an additional 5 minutes or until the buns are golden brown and slightly crisp on top.
- Cool and Serve: Remove the sliders from the oven and let them cool for a few minutes to set before slicing into individual servings.
- Add Garnish: Optionally, add fresh lettuce and tomato slices to each slider before serving for added freshness and texture.
Notes
- Drain the cooked beef fat properly to prevent soggy sliders.
- Feel free to add other condiments or toppings such as pickled jalapeños for a spicy kick.
- For a cheesier version, add extra shredded cheddar on top before baking.
- Slider buns can be replaced with Hawaiian rolls for a sweeter flavor profile.
- Make ahead by preparing the mixture and assembling sliders, then refrigerate until ready to bake.


