
If you have ever wished you could make bakery-quality bread at home without all the fuss, then you are in for a treat with this Easy No Knead Bread Recipe. With just a few simple ingredients and minimal effort, you’ll create a crusty, golden loaf that has a chewy interior and a wonderful flavor. This bread is a perfect match for any meal or as a base for your favorite sandwich, and the best part is you do not need to spend hours kneading dough. It’s a straightforward, rewarding way to enjoy homemade bread any day of the week.
Ingredients You’ll Need
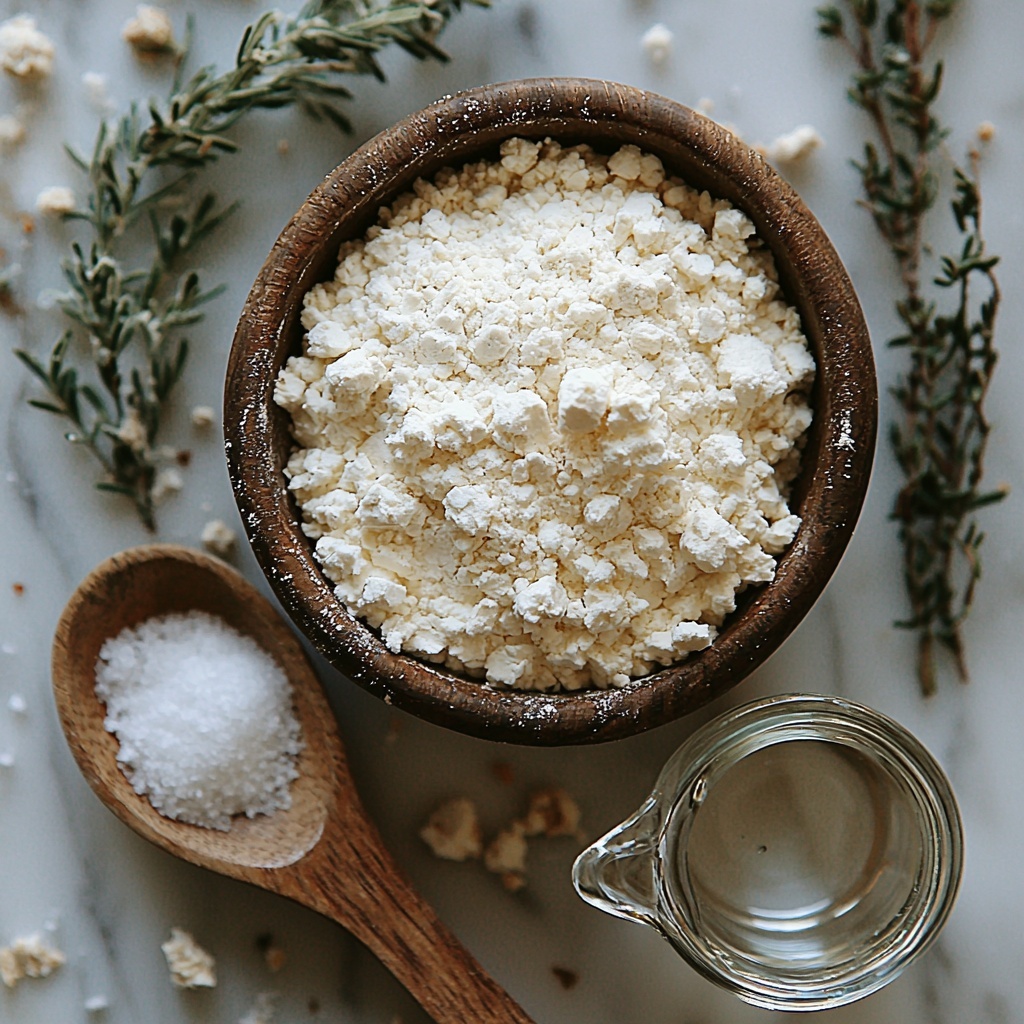
Every ingredient in this recipe plays a crucial role in crafting that perfect loaf. They are basic pantry staples you likely have on hand, yet combined they create a bread that tastes as if it was made with love and patience in a rustic bakery.
- 3 cups All-purpose Flour: This provides the structure and chewiness of the bread, and feel free to experiment with flour types to add character.
- 2 teaspoons Salt: Essential for flavor balance, it enhances the taste of the bread without overpowering it.
- 2 teaspoons Active dry yeast: The magical agent that makes your dough rise beautifully and develop subtle flavors.
- 1.5 cups warm water (between 100-110 degrees F): Warm water activates the yeast and helps bring everything together into a soft, pliable dough.
How to Make Easy No Knead Bread Recipe
Step 1: Mix Your Dry Ingredients
Start by combining the flour, salt, and active dry yeast in a large bowl. Stir these together well so the yeast and salt are evenly distributed. This simple step sets the foundation for your bread’s texture and flavor.
Step 2: Add Warm Water and Combine
Next, pour the warm water into the flour mixture. Stir with a spoon or your hands until all the flour is moistened and forms a shaggy dough. Don’t overwork it—no kneading here; just bring everything together until combined.
Step 3: Let the Dough Rise
Cover the bowl with plastic wrap or a clean towel and place it in a warm spot. Give the yeast time to work its magic and allow the dough to rise for 2 hours. You’ll see the dough puff up and become bubbly—that’s a good sign the yeast is alive and well.
Step 4: Preheat Your Dutch Oven
Almost ready to bake! About 30 minutes before your dough is done rising, place the lid on your Dutch oven, put it in the oven, and preheat to 450 degrees Fahrenheit. This step ensures a hot environment that will create that coveted crispy crust.
Step 5: Shape Your Loaf
Lightly flour a flat surface and gently turn your risen dough out of the bowl onto it. Shape it into a round loaf by folding edges toward the center without pounding or kneading. Don’t forget to lightly flour the top and score it with a sharp knife for that classic look.
Step 6: Transfer to Dutch Oven
Lift the parchment paper with the dough and carefully place it into the hot Dutch oven. Cover it with the lid to trap steam, which helps form a crispy crust as the bread bakes.
Step 7: Bake Covered and Uncovered
Bake the bread with the lid on for 30 minutes initially. Then, remove the lid and continue baking uncovered for another 15 minutes. This process deepens the crust’s color and crunch wonderfully.
Step 8: Cool Before Slicing
Once baked, remove the bread carefully from the Dutch oven and set it on the counter. Let it cool completely before slicing to allow the crumb to set perfectly. Waiting is hard, but it’s worth every second.
How to Serve Easy No Knead Bread Recipe
Garnishes
While the bread shines on its own, you can elevate it with a few simple garnishes. A drizzle of olive oil, a sprinkle of flaky sea salt, or even a dusting of garlic powder can add interesting flavor layers for entertaining guests or treating yourself.
Side Dishes
This bread pairs beautifully with soups, stews, cheeses, and charcuterie boards. Imagine dipping a warm slice into a rich tomato soup or topping with melted butter for a simple, satisfying snack.
Creative Ways to Present
Transform your loaf into a centerpiece by slicing it into thick slabs and arranging on a rustic wooden board with fresh herbs and dipping oils. You can also hollow it out to create a bread bowl for chowders or dips, impressing everyone at your table.
Make Ahead and Storage
Storing Leftovers
Keep your leftover bread fresh by storing it in a paper bag or loosely wrapped in a tea towel at room temperature. Avoid plastic bags unless freezing, as they trap moisture and soften the crust.
Freezing
If you want to enjoy this bread later, freeze the cooled loaf wrapped tightly in plastic wrap and then aluminum foil. When ready, thaw at room temperature. It’s a great way to reduce waste and have fresh bread on hand anytime.
Reheating
To revive your bread’s crispy crust and warm crumb, pop it into a 350-degree Fahrenheit oven for 10-15 minutes. This quick step brings back that freshly baked magic every single time.
FAQs
Can I use whole wheat flour instead of all-purpose?
Absolutely! Whole wheat flour can be used, though it may result in a denser loaf. To maintain a light texture, try substituting only half of the all-purpose flour with whole wheat flour.
Do I need a Dutch oven to make this bread?
While a Dutch oven gives the best crust by trapping steam, you can bake your loaf on a preheated baking stone or heavy-duty baking sheet covered with a large bowl or pan to mimic similar conditions.
How long will the bread keep fresh?
The bread is best enjoyed within 2-3 days at room temperature. Storing it in appropriate conditions will extend its freshness slightly, but it’s hard to resist before then!
Can I add herbs or other flavors to the dough?
Yes! Feel free to mix in fresh herbs, garlic powder, or even olives for an exciting twist. Just add them in step 1 with your dry ingredients.
What if my dough doesn’t rise properly?
If your dough seems slow to rise, check the water temperature was warm but not hot, as excessive heat can kill the yeast. Also, make sure your yeast is fresh and active. A warm, draft-free spot helps too.
Final Thoughts
This Easy No Knead Bread Recipe is truly a game changer for anyone who loves fresh, homemade bread without complicated steps. It’s approachable, requires minimum hands-on time, and rewards you with a loaf that looks and tastes like it came from a professional bakery. I can’t wait for you to try it and savor the comforting joy that only homemade bread can bring.
Print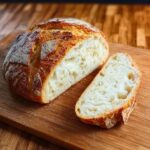
Easy No Knead Bread Recipe
- Prep Time: 10 minutes
- Cook Time: 45 minutes
- Total Time: 2 hours 55 minutes
- Yield: 12 servings
- Category: Bread
- Method: Baking
- Cuisine: American
- Diet: Vegetarian
Description
This Easy No Knead Bread recipe yields a wonderfully crusty and soft artisan-style loaf with minimal effort. Combining basic pantry ingredients like all-purpose flour, salt, yeast, and warm water, this bread requires no kneading and uses a Dutch oven for a perfect bake. Ideal for beginners or those craving homemade bread without the fuss, it provides a delicious, golden crust and tender crumb in under an hour of active cooking.
Ingredients
Dry Ingredients
- 3 cups All-purpose Flour
- 2 teaspoons Salt
- 2 teaspoons Active dry yeast
Wet Ingredients
- 1.5 cups warm water (between 100-110°F)
Instructions
- Mix Dry Ingredients: In a large bowl, combine the flour, salt, and active dry yeast. Stir well to evenly distribute all dry ingredients.
- Add Warm Water: Heat water to 100-110°F and pour it into the flour mixture. Stir using a spoon or your hands until all flour is fully incorporated, forming a shaggy dough. Avoid overworking the dough.
- Let Dough Rise: Cover the bowl with plastic wrap or a clean towel and place it in a warm spot to rise undisturbed for 2 hours until doubled in size and bubbly.
- Preheat Dutch Oven: Thirty minutes before the dough finishes rising, place the lid on your Dutch oven and put it inside the oven. Preheat your oven to 450°F to get the Dutch oven hot.
- Shape Dough: When the dough has risen, lightly flour a flat surface and gently scoop the dough out of the bowl onto it. Form the dough into a round loaf, then lightly score the top with a sharp knife to help with oven expansion.
- Prepare for Baking: Place the shaped dough on a large sheet of parchment paper for easy transfer into the Dutch oven.
- Bake Covered: Carefully remove the heated Dutch oven from the oven, lift the dough with the parchment paper, and place it inside. Cover with the lid and place it back in the oven to bake for 30 minutes, which helps create steam for a crispy crust.
- Bake Uncovered: After 30 minutes, remove the lid from the Dutch oven and bake the bread uncovered for an additional 15 minutes to deepen the crust’s color.
- Cool the Bread: Remove the Dutch oven from the oven and carefully lift the bread out. Place the bread on a wire rack or countertop and allow it to cool completely before slicing to ensure the crumb sets properly.
Notes
- Use a kitchen thermometer to ensure water is between 100-110°F for optimal yeast activation.
- The dough is sticky and loose; do not add extra flour beyond what is specified.
- The Dutch oven mimics a steam oven environment which helps develop a crispy crust.
- Allow the bread to cool completely for at least 1 hour before slicing to prevent a gummy texture.
- You can store leftover bread wrapped at room temperature for 2-3 days or freeze slices.


