
If you’ve been searching for that perfect, cheesy, melt-in-your-mouth treat to brighten up any meal or snack time, this Cheese Biscuits Recipe is an absolute game changer. It’s easy, quick, and uses a handful of simple ingredients to create biscuits packed with wonderful cheese flavor and a tender, fluffy texture. Whether you’re a novice baker or a seasoned pro looking for a crowd-pleaser, these biscuits deliver that warm, homemade comfort with every bite.
Ingredients You’ll Need
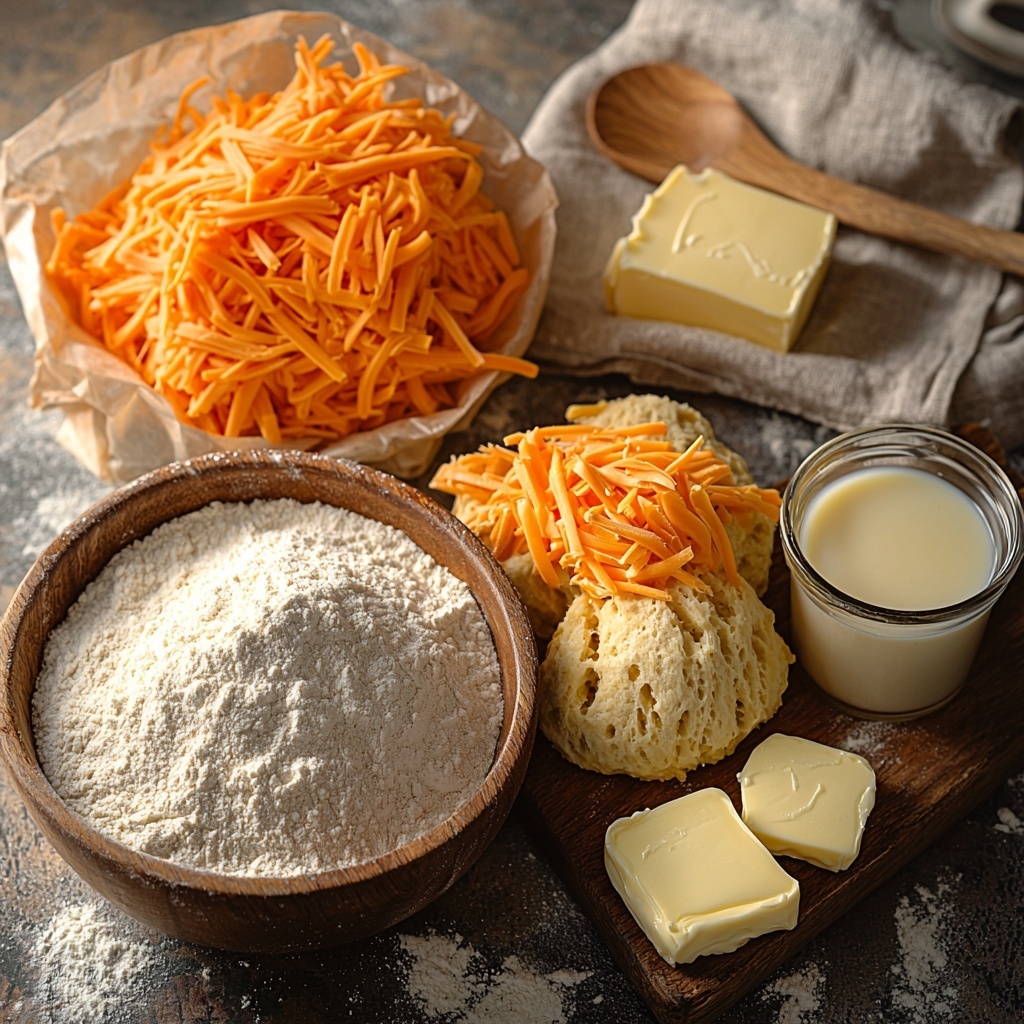
Gathering the right ingredients is the first step to making your Cheese Biscuits Recipe shine. Each component plays an important role — from giving structure and rise to infusing cheesy richness and a golden finish.
- 2 cups Self-Rising Flour: This is your base and provides the perfect lightness without extra leavening agents.
- 1-2 cups Shredded Cheese: Cheddar, Gouda, or your favorite cheese adds that signature savory punch and gooey texture.
- 1 1/3 cups Milk: Almond milk works beautifully for a dairy-free twist while keeping the dough moist and tender.
- Butter (optional): Brushing melted butter on top helps achieve a beautifully golden and slightly crisp crust.
How to Make Cheese Biscuits Recipe
Step 1: Preheat and Prepare
Begin by setting your oven to 425°F (220°C). A roaring hot oven is key to getting these biscuits to puff up perfectly and develop that gorgeous golden crust we’re after.
Step 2: Mix the Dry Ingredients
In a large mixing bowl, add your self-rising flour and whisk it thoroughly. This helps distribute the leavening evenly, ensuring every biscuit rises beautifully.
Step 3: Incorporate the Cheese
Gently fold in your shredded cheese, distributing it evenly through the flour. This step is where your biscuits start to gain their delightful cheesy character.
Step 4: Add the Milk
Slowly pour in the milk while mixing gently with a rubber spatula. Avoid overmixing; you want the dough to just come together without becoming tough.
Step 5: Shape the Biscuits
Use your hands or a spoon to shape the dough into small rounds, about two inches across, and place them on a prepared baking sheet with a little space between each.
Step 6: Optional Butter Brushing
If you love that shiny, buttery finish, brush the tops of the biscuits with melted butter right before baking. It’s a small step that adds a big flavor boost.
Step 7: Bake to Perfection
Pop the biscuits into the oven and bake for 15 to 20 minutes until they are puffed up and golden brown. The kitchen will fill with an irresistible aroma that’s sure to have everyone eager to dig in.
Step 8: Cool Slightly and Serve Warm
Let your biscuits cool for a few minutes before serving. Warm, fluffy, and loaded with cheese – this is comfort food at its finest.
How to Serve Cheese Biscuits Recipe
Garnishes
Enhance the flavor and presentation by sprinkling freshly chopped herbs like chives or parsley over the biscuits as they come out of the oven. A little cracked black pepper can also add a nice touch of spice and depth.
Side Dishes
This Cheese Biscuits Recipe pairs wonderfully with hearty dinners such as chili, soup, or a fresh salad. They also shine on a brunch table alongside scrambled eggs and crispy bacon for a truly indulgent start to the day.
Creative Ways to Present
For a playful twist, consider slicing these biscuits in half and creating mini sandwiches with ham, arugula, and a dab of mustard or aioli. They also work beautifully stacked with a scoop of creamy pimento cheese for a Southern-inspired snack that’s impossible to resist.
Make Ahead and Storage
Storing Leftovers
If you have any leftover cheese biscuits, store them in an airtight container at room temperature for up to two days. This keeps them soft and fresh without drying out.
Freezing
To enjoy these delicious biscuits anytime, freeze them after baking and cooling. Wrap each biscuit tightly in plastic wrap, then place them in a freezer-safe bag or container for up to three months.
Reheating
Reheat frozen or refrigerated biscuits in a preheated oven at 350°F (175°C) for about 10 minutes until warmed through. Avoid microwaving if you want to preserve that crispy outside and fluffy inside texture.
FAQs
Can I use regular flour instead of self-rising flour?
You can, but you’ll need to add baking powder and salt to mimic the self-rising flour’s leavening and seasoning. For every 2 cups of all-purpose flour, add 3 teaspoons of baking powder and 1/2 teaspoon of salt.
What cheeses work best for this Cheese Biscuits Recipe?
Cheddar is a classic choice, but Gouda, Monterey Jack, or even a sharp white cheddar add delicious variations. Feel free to experiment with the cheese flavor you love most.
Is there a dairy-free version of this recipe?
Absolutely! Using almond milk keeps the biscuits moist without dairy, and you can substitute dairy-free shredded cheese to keep the cheesy flavor intact.
Can I make these biscuits ahead of time?
You can prepare the dough ahead and refrigerate it for up to 24 hours before baking. Just shape and bake when ready for fresh, warm biscuits anytime.
How do I get the biscuits to rise nicely?
The key is using self-rising flour and not overmixing the dough. Also, baking at a high temperature ensures the biscuits puff up quickly and develop that perfect fluffy texture.
Final Thoughts
There’s something incredibly satisfying about biting into a warm, freshly baked biscuit loaded with cheese, and this Cheese Biscuits Recipe nails that experience every single time. It’s straightforward, joyful to make, and always a hit — perfect for gatherings, meals, or whenever your craving for cheesy goodness strikes. Don’t wait to try it yourself and watch these irresistible biscuits become a staple in your kitchen.
Print
Cheese Biscuits Recipe
- Prep Time: 10 minutes
- Cook Time: 20 minutes
- Total Time: 35 minutes
- Yield: 12 servings
- Category: Bread & Baking
- Method: Baking
- Cuisine: American
- Diet: Gluten Free
Description
These delicious Cheese Biscuits are golden, fluffy, and packed with your favorite melted cheese. Perfect as a snack or a side, they come together quickly using self-rising flour and almond milk for a dairy-free option. Soft on the inside with a slightly crisp exterior, they make a comforting treat to enjoy warm from the oven.
Ingredients
Dry Ingredients
- 2 cups Self-Rising Flour (gluten-free if needed)
- 1–2 cups Shredded Cheese (cheddar, Gouda, or your favorite)
Wet Ingredients
- 1 1/3 cups Almond Milk (or regular milk for dairy)
- Butter (for brushing on top, optional)
Instructions
- Preheat Oven: Preheat your oven to 425°F (220°C) to ensure it’s hot and ready for baking the biscuits evenly.
- Mix Dry Ingredients: In a large mixing bowl, add the 2 cups of self-rising flour and whisk well to aerate and ensure even consistency.
- Add Cheese: Fold in the 1-2 cups of shredded cheese gently, distributing it evenly throughout the flour mixture.
- Add Milk: Slowly pour in the 1 1/3 cups of almond milk (or regular milk) and mix gently with a rubber spatula until a soft dough forms.
- Shape Biscuits: Shape the dough into small rounds by hand or using a biscuit cutter and place them spaced evenly on a prepared baking sheet.
- Brush with Butter (Optional): Brush the tops lightly with melted butter to add a golden sheen and extra flavor.
- Bake: Bake in the preheated oven for 15-20 minutes or until the biscuits are golden brown and puffed up.
- Cool and Serve: Let the biscuits cool for a few minutes before serving warm for the best texture and taste.
Notes
- You can use any shredded cheese you prefer, such as cheddar for a classic flavor or Gouda for a smoky aroma.
- For a dairy-free version, use almond milk and skip the butter or use a dairy-free alternative.
- Self-rising flour already contains baking powder and salt, so no need to add extra leavening agents.
- Brush with butter is optional but adds richness and a golden top.
- Store leftover biscuits in an airtight container and reheat in the oven for best results.


