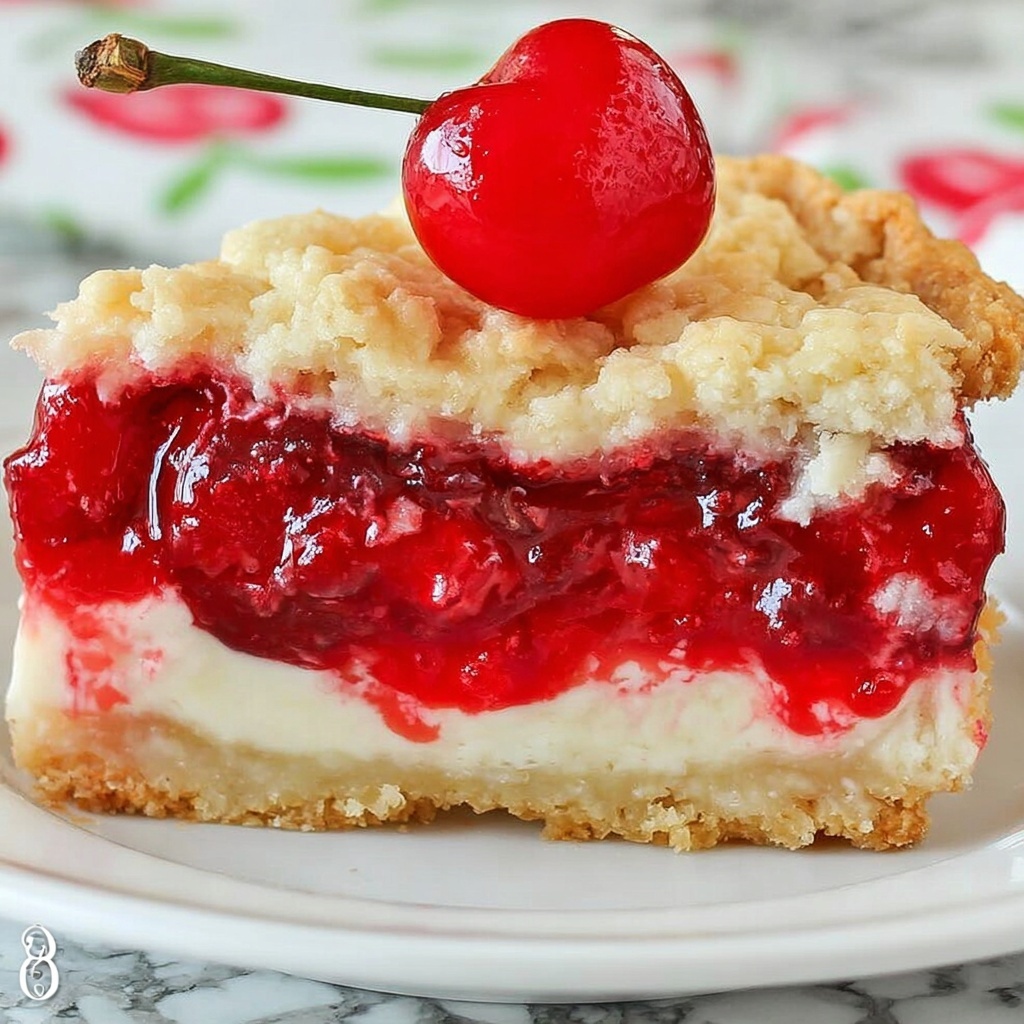
If you’re craving a dessert that perfectly balances the buttery richness of a shortbread crust with the sweet, tangy burst of cherry filling, this Cherry Pie Bars Recipe is your new best friend. Imagine the ease of a classic cherry pie but in a convenient bar form, making it simple to serve at picnics, potlucks, or family dinners. Each bite melts with a luscious cherry center and a tender crumbly crust that’s just the right amount of sweet. Whether you’re a seasoned baker or just starting out, these bars bring pure joy with their rustic charm and irresistible flavor.
Ingredients You’ll Need
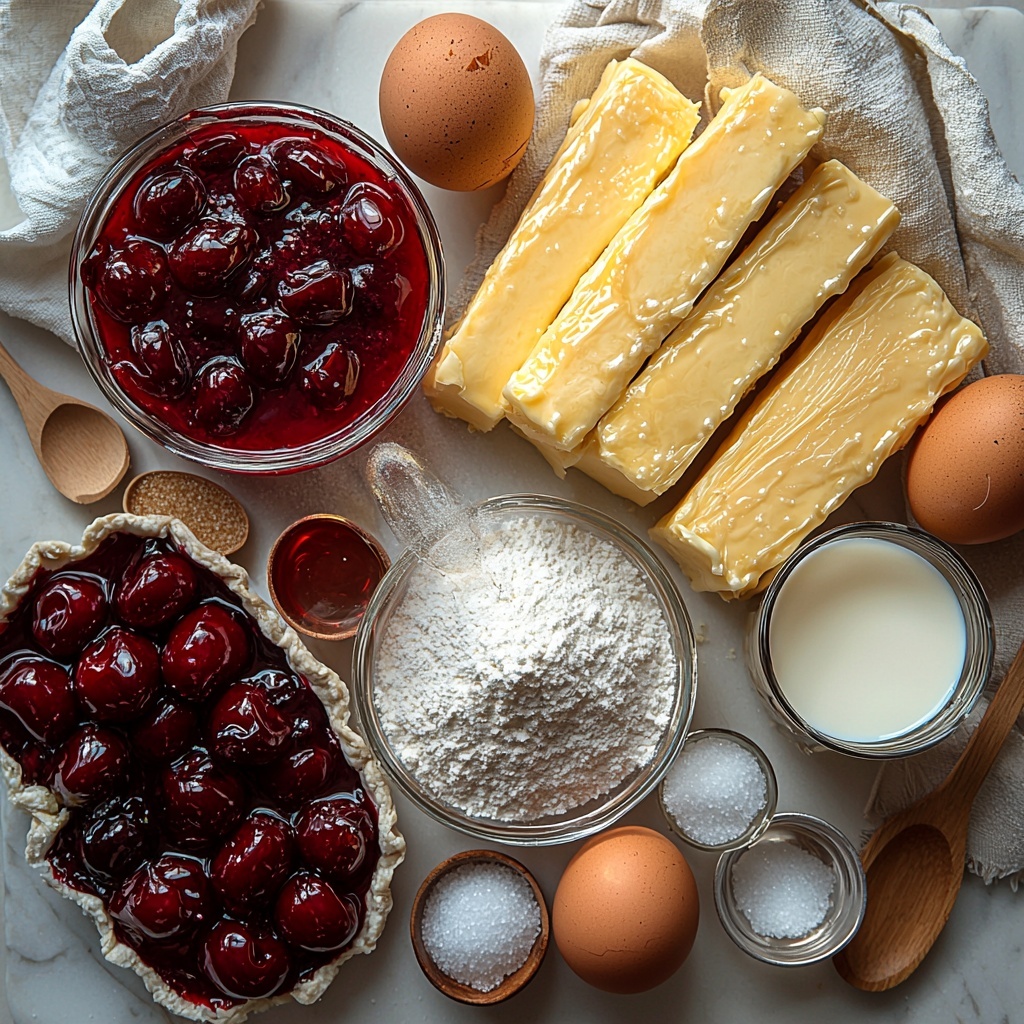
Creating these Cherry Pie Bars requires just a handful of everyday ingredients that come together beautifully to give you layers of flavor and texture. Each item plays a key role, from the silky butter that creates a tender crust to the cherry pie filling that adds that vibrant, juicy pop we all love.
- Butter (2 sticks, softened): Softening the butter makes mixing easier and ensures your crust is rich and tender.
- Sugar (2 cups): Provides sweetness throughout the bars and a delightful sprinkle on top for a slight crunch.
- Eggs (2): Helps bind the dough while adding moisture and richness.
- Salt (pinch): Enhances all the flavors, bringing out the best in your ingredients.
- Vanilla extract (1 teaspoon): Adds a warm, comforting depth that complements the cherries perfectly.
- All-purpose flour (3 cups): The foundation of your dough, creating structure without heaviness.
- Baking powder (1 teaspoon): Gives a subtle lift, keeping the bars from being too dense.
- Milk (1/4 cup): Adds just enough moisture to bring the batter together without making it too sticky.
- Cherry pie filling (2 cans): The star ingredient bursting with vibrant cherry flavor and a luscious syrupy texture.
- Extra sugar (for sprinkling): A finishing touch that adds sparkle and a bit of crunch on top.
- Extra flour (for prepping the dish): Prevents sticking and helps create clean slices.
How to Make Cherry Pie Bars Recipe
Step 1: Prepare Your Baking Dish
Start by preheating your oven to 350°F (175°C). Grease your 9×13-inch baking dish thoroughly, then dust it lightly with flour. This simple step ensures your cherry pie bars won’t stick and will come out in perfect, neat pieces, ready to be enjoyed without a mess.
Step 2: Make the Batter
In a large mixing bowl, cream together the softened butter, sugar, eggs, and vanilla extract until your mixture is light and fluffy. This is where the magic really begins, as the creamy texture will give your crust a melt-in-your-mouth quality. Next, combine the flour, salt, and baking powder, stirring them into the wet ingredients. Finally, blend in the milk until you get a smooth, cohesive dough that’s easy to work with.
Step 3: Assemble the Base Layer
Take half of your dough and spread it evenly across the bottom of your prepared dish. Since the dough is thick, dust your spoon with a little flour to help smooth it out without sticking. This base layer is crucial as it holds the cherry goodness and supports the topping, offering that buttery, crumbly texture with every bite.
Step 4: Add the Cherry Filling
Sprinkle a light dusting of sugar over the base, then evenly spread both cans of cherry pie filling across the dough. This double layer ensures every corner is loaded with rich cherry flavor, juicy and sweet, perfectly complementing the golden crust underneath. Add just a little extra sugar on top to enhance the cherry’s natural sweetness and help develop a slight caramelized finish.
Step 5: Top with Remaining Dough
Drop the remaining dough over the cherry layer in generous spoonfuls. Don’t worry about making it perfect—this rustic look is part of the charm! Use the back of your spoon or your fingers to gently spread the dough over the cherries, leaving some fruit peeking through for a beautiful, homemade appearance.
Step 6: Bake Until Golden
Give one final sprinkle of sugar on top of your bars before placing the dish in the oven. Bake for 35 to 45 minutes, or until the top is golden brown and a toothpick inserted into the dough comes out clean. You’ll also notice the cherry filling bubbling around the edges—an irresistible sign your bars are ready!
Step 7: Cool and Slice
After baking, let the bars cool in the pan for at least 30 minutes. For cleaner slices, place the dish in the refrigerator before cutting into 15 squares. Serve these Cherry Pie Bars warm for a cozy treat, or enjoy them chilled as a refreshing dessert that’s perfect any time of the day.
How to Serve Cherry Pie Bars Recipe
Garnishes
While these bars are delightful on their own, adding a light dusting of powdered sugar, a dollop of whipped cream, or a scoop of vanilla ice cream elevates the experience even more. These touches add cool creaminess or a touch of elegance that pairs beautifully with the warm, fruity bars.
Side Dishes
Cherry Pie Bars go wonderfully with a simple cup of fresh brewed coffee or herbal tea, balancing the sweetness and providing a comforting, homey feel. For brunch or dessert spreads, try serving them alongside fresh fruit salad or a cheese platter for a fun contrast of flavors.
Creative Ways to Present
For special occasions, consider layering Cherry Pie Bars in individual glass jars with whipped cream and fresh cherries for a charming parfait-style presentation. Alternatively, cut the bars into mini bites on a dessert tray for easy grab-and-go treats at parties or family gatherings.
Make Ahead and Storage
Storing Leftovers
Store any leftover Cherry Pie Bars in an airtight container at room temperature for up to two days, or refrigerate to keep them fresh for about a week. The bars actually develop more flavor the next day as the cherry filling settles into the crust.
Freezing
These bars freeze beautifully. Wrap them tightly in plastic wrap and then place in a freezer-safe container or bag. They can be frozen for up to three months, making them a perfect make-ahead dessert for busy weeks or unexpected guests.
Reheating
To enjoy your Cherry Pie Bars warm after freezing or refrigeration, pop them in a preheated oven at 300°F (150°C) for about 10 minutes. This gentle reheating preserves the texture while reviving the luscious cherry filling and buttery crust like they’re freshly baked.
FAQs
Can I use fresh cherries instead of canned cherry pie filling?
While fresh cherries are delicious, using canned cherry pie filling is key to achieving that perfect balance of sweetness, texture, and moisture for the bars. If you want to use fresh cherries, be prepared to cook them with sugar and a thickener like cornstarch first to mimic the pie filling’s consistency.
What can I substitute for butter in this recipe?
Butter is essential for the flavor and texture of these bars, but if you need a substitute, use an equal amount of margarine or a plant-based butter alternative. Keep in mind this might slightly affect the richness and crumbly quality of the bars.
How do I make sure my bars don’t get soggy?
Properly pre-baking the base layer and using a thicker cherry pie filling help prevent sogginess. Also, allowing the bars to cool completely before slicing helps everything set up nicely.
Can I make this recipe gluten-free?
Absolutely! Swap the all-purpose flour for a gluten-free flour blend that measures cup for cup. Just be sure the baking powder you use is gluten-free as well, and expect a slightly different texture but just as tasty results.
What’s the best way to cut neat slices?
Chill the bars in the refrigerator for at least 30 minutes after they’ve cooled; this firms them up and makes slicing much cleaner. Use a sharp knife, wiping it clean between cuts for the best-looking squares.
Final Thoughts
There’s something so comforting about a homemade treat that brings back nostalgic memories of classic cherry pies, but these Cherry Pie Bars Recipe take it up a notch with their delightful ease and rustic charm. I can’t recommend making a batch enough—whether for a cozy night in or to wow your guests at your next gathering, these bars are guaranteed to become a beloved favorite in your recipe collection.
Print
Cherry Pie Bars Recipe
- Prep Time: 15 minutes
- Cook Time: 40 minutes
- Total Time: 55 minutes
- Yield: 15 servings
- Category: Dessert
- Method: Baking
- Cuisine: American
Description
These Cherry Pie Bars combine a rich, buttery crust with luscious cherry pie filling, baked to golden perfection. Easy to prepare and perfect for sharing, these bars offer a delightful twist on traditional cherry pie with a rustic, homemade appeal that’s sure to impress.
Ingredients
Crust and Dough
- 2 sticks of butter – softened
- 2 cups of sugar
- 2 eggs
- Pinch of salt
- 1 teaspoon vanilla extract
- 3 cups all-purpose flour
- 1 teaspoon baking powder
- 1/4 cup milk
- Extra flour for pressing dough into the dish
Filling
- 2 cans of cherry pie filling
- Extra sugar for sprinkling
Instructions
- Preheat and Prepare Dish: Preheat your oven to 350°F (175°C). Grease and flour a 9×13-inch baking dish to prevent sticking and to help ensure easy slicing later.
- Make the Dough: In a large mixing bowl, cream together the softened butter, sugar, eggs, and vanilla extract until the mixture is light and fluffy. This creates a soft texture in the crust. Next, add the flour, salt, and baking powder, mixing until a smooth dough forms. Finally, pour in the milk and blend until fully combined.
- Form the Base Layer: Take half of the dough and spread it evenly across the bottom of your prepared baking dish. The batter is thick, so you may want to dip your spoon into some extra flour to prevent sticking while spreading.
- Add Sugar and Cherry Filling: Sprinkle a layer of sugar over the base dough for extra sweetness. Pour one can of cherry pie filling evenly over the dough, then follow with the second can of cherry pie filling, spreading it evenly to cover the base. Lightly sprinkle more sugar on top of the cherry filling.
- Top Layer of Dough: Using a spoon, drop heaping tablespoons of the remaining dough over the cherry filling. Gently spread or pat down the dough over the cherries with the back of the spoon or your fingers, but it can remain somewhat rustic and uncovered.
- Final Sugar Sprinkle and Bake: Sprinkle a little more sugar on top of the dough. Place the dish in the preheated oven and bake for 35 to 45 minutes or until a toothpick inserted in the dough comes out clean. The top should be golden brown, and the cherry filling should be bubbling at the edges.
- Cool and Serve: Allow the bars to cool in the pan for at least 30 minutes before slicing. For neater slices, chill them in the refrigerator before cutting. Serve warm or cold and enjoy the luscious cherry bars.
Notes
- Softened butter is crucial for creaming with sugar to achieve the right texture in the crust.
- Extra flour helps prevent sticking when spreading thick dough.
- Sprinkling sugar between layers enhances sweetness and adds slight crunch.
- Rustic topping is traditional and adds to the charm of the bars.
- Chilling before slicing can improve cutting and presentation.
- Leftover bars store well in the refrigerator for up to 3-4 days.


