
If you’ve ever wanted to bake a loaf that captures the soft, tender crumb and perfect crust of your favorite bakery sandwich bread, you’re in for a treat with this Classic White Sandwich Bread Recipe. It’s wonderfully simple, using gluten-free all-purpose flour and a handful of pantry staples to create a loaf that’s fluffy yet sturdy enough to hold all your favorite sandwich fixings. Whether you’re new to bread baking or a seasoned pro, this recipe delivers that warm, homemade comfort that everyone loves in classic white bread.

Ingredients You’ll Need
These ingredients are straightforward yet indispensable, each bringing something special to your bread. They work together to create a perfect texture, enhance flavor, and give that beautiful golden crust you’re aiming for.
- 2 cups gluten-free all-purpose flour: The foundation of the bread, ensuring it’s accessible to those avoiding gluten without sacrificing softness.
- 1 tablespoon sugar: Adds just the right touch of sweetness and helps feed the yeast for a good rise.
- 1 teaspoon salt: Balances flavor and strengthens the dough’s structure.
- 1 tablespoon active dry yeast: The little powerhouse that makes your bread rise and become airy.
- 1 cup warm water: Activates the yeast and hydrates the flour to develop that tender crumb.
- 2 tablespoons olive oil: Adds moisture and a subtle richness to the bread.
- 2 eggs: Provide structure, color, and richness to the dough.
How to Make Classic White Sandwich Bread Recipe
Step 1: Prepare Your Oven and Pan
Start by preheating your oven to 375°F (190°C) and greasing a loaf pan to prevent any sticking. This sets up a perfect environment for your bread to bake evenly with a lovely crust.
Step 2: Mix the Dry Ingredients
In a large mixing bowl, combine the gluten-free all-purpose flour, sugar, salt, and active dry yeast. Making sure these are well mixed ensures your yeast will activate properly and that your flavors are evenly distributed throughout the bread.
Step 3: Add Wet Ingredients and Form Dough
Pour in the warm water, olive oil, and crack in the eggs. Mix everything together until you get a smooth, cohesive dough. This is where the dough comes to life with all ingredients blending to create that tender crumb and moisture.
Step 4: Transfer to Loaf Pan
Once your dough is smooth and ready, transfer it into the prepared loaf pan. Smooth the top gently with a spatula for an even rise and a pretty finish after baking.
Step 5: Bake Until Golden and Hollow-Sounding
Bake the dough for 40 minutes at 375°F. You’ll know it’s ready when the crust is beautifully golden brown and it sounds hollow when you tap on the bottom, signaling that it’s perfectly cooked through.
Step 6: Cool Before Slicing
Let your bread cool in the pan for 10 minutes, then carefully remove it and transfer to a wire rack to cool completely. Cooling helps the bread set properly so those slices won’t be gummy or fall apart.
How to Serve Classic White Sandwich Bread Recipe
Garnishes
This Classic White Sandwich Bread Recipe is perfect on its own, but adding a light brush of melted butter while warm can elevate its flavor and give the crust a glorious shine that will have everyone reaching for seconds.
Side Dishes
Serve your fresh-made bread alongside soups like creamy tomato or hearty chicken noodle, or pair it with a crisp salad for a well-rounded meal that’s both comforting and satisfying.
Creative Ways to Present
Try slicing the bread thick for a gourmet grilled cheese or toast it lightly and top with avocado and a sprinkle of sea salt for a quick, delicious snack. This bread’s soft texture makes it a versatile canvas for your culinary creativity.
Make Ahead and Storage
Storing Leftovers
Once fully cooled, store your bread in an airtight container or a resealable plastic bag at room temperature. It will stay fresh for 3 to 4 days, perfect for enjoying throughout the week without losing its delightful texture.
Freezing
If you want to keep your loaf longer, slice it first and freeze in a freezer-safe bag. It can stay deliciously fresh for up to 3 months. Just thaw slices as needed or toast them straight from the freezer.
Reheating
To bring back that freshly-baked warmth, toast slices lightly or warm them in the oven wrapped in foil for about 10 minutes. This will restore softness and enhance the bread’s homemade charm.
FAQs
Can I use regular all-purpose flour instead of gluten-free?
Yes, you can substitute regular all-purpose flour if you’re not avoiding gluten. It will change the texture slightly, making it more traditional, but the recipe remains delicious.
Why is yeast important in this Classic White Sandwich Bread Recipe?
Yeast is a living organism that produces gas, causing the dough to rise and become light and airy. Without it, the bread would be dense and heavy.
Can I add seeds or herbs to this bread?
Absolutely! Mixing in seeds like sesame or herbs such as rosemary can add extra flavor and texture, making your loaf uniquely yours.
What if my bread doesn’t rise as expected?
Make sure your water is warm but not hot, and your yeast is fresh. Sometimes yeast can be inactive if old, impacting the rise.
How do I know when the bread is fully baked?
The bread should be golden brown and sound hollow when you tap the bottom. This indicates the moisture has baked out correctly and the texture is set.
Final Thoughts
There’s something incredibly satisfying about pulling a warm, golden loaf of homemade bread from the oven, especially when it’s a Classic White Sandwich Bread Recipe that’s simple yet so rewarding. Whether you’re making sandwiches, toasting slices, or just enjoying a piece with butter, this recipe is a go-to that promises comfort and deliciousness every time. Give it a try—you might just find your new favorite loaf!
Print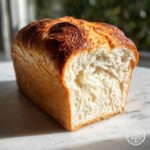
Classic White Sandwich Bread Recipe
- Prep Time: 10 minutes
- Cook Time: 40 minutes
- Total Time: 55 minutes
- Yield: 1 loaf (approximately 8 slices)
- Category: Bread
- Method: Baking
- Cuisine: American
- Diet: Gluten Free
Description
This Classic White Sandwich Bread recipe features a soft, fluffy gluten-free loaf perfect for sandwiches or toast. Made with a blend of gluten-free flour, yeast, and enriched with olive oil and eggs for moisture and tenderness, it offers a delicious gluten-free alternative to traditional sandwich bread.
Ingredients
Dry Ingredients
- 2 cups gluten-free all-purpose flour
- 1 tablespoon sugar
- 1 teaspoon salt
- 1 tablespoon active dry yeast
Wet Ingredients
- 1 cup warm water
- 2 tablespoons olive oil
- 2 eggs
Instructions
- Preheat Oven and Prepare Pan: Preheat your oven to 375°F (190°C) and grease a loaf pan thoroughly to prevent sticking.
- Mix Dry Ingredients: In a large mixing bowl, combine the gluten-free flour, sugar, salt, and active dry yeast, ensuring the ingredients are evenly distributed.
- Add Wet Ingredients: Pour in the warm water, olive oil, and eggs; mix the ingredients together until a smooth dough forms, suitable for gluten-free flour consistency.
- Transfer Dough to Pan: Spoon the dough into the prepared loaf pan, then smooth the surface with a spatula to create an even top.
- Bake the Bread: Bake the dough in the preheated oven for 40 minutes until the crust is golden brown and the loaf sounds hollow when tapped, indicating it is fully baked.
- Cool the Bread: Allow the bread to cool in the pan for 10 minutes before transferring it to a wire rack to cool completely, ensuring the best texture for slicing.
Notes
- Use warm water (about 110°F) to activate the yeast effectively.
- Ensure gluten-free flour blend contains xanthan gum or add 1 teaspoon for better texture.
- Let the bread cool completely before slicing to prevent crumbling.
- Store bread in an airtight container at room temperature for up to 3 days or freeze for longer storage.


