
If you crave a dish that perfectly balances crispy, tender chicken with a luscious, sticky sauce, then you’re in for a treat with this Sesame Chicken: Sticky Asian Sauce Recipe You’ll Love Recipe. It brings together simple ingredients into an unforgettable combination of sweet, savory, and slightly tangy flavors that hug every bite of crispy chicken. Whether you’re cooking for family or friends, this recipe promises a restaurant-quality meal that is surprisingly easy and totally satisfying.
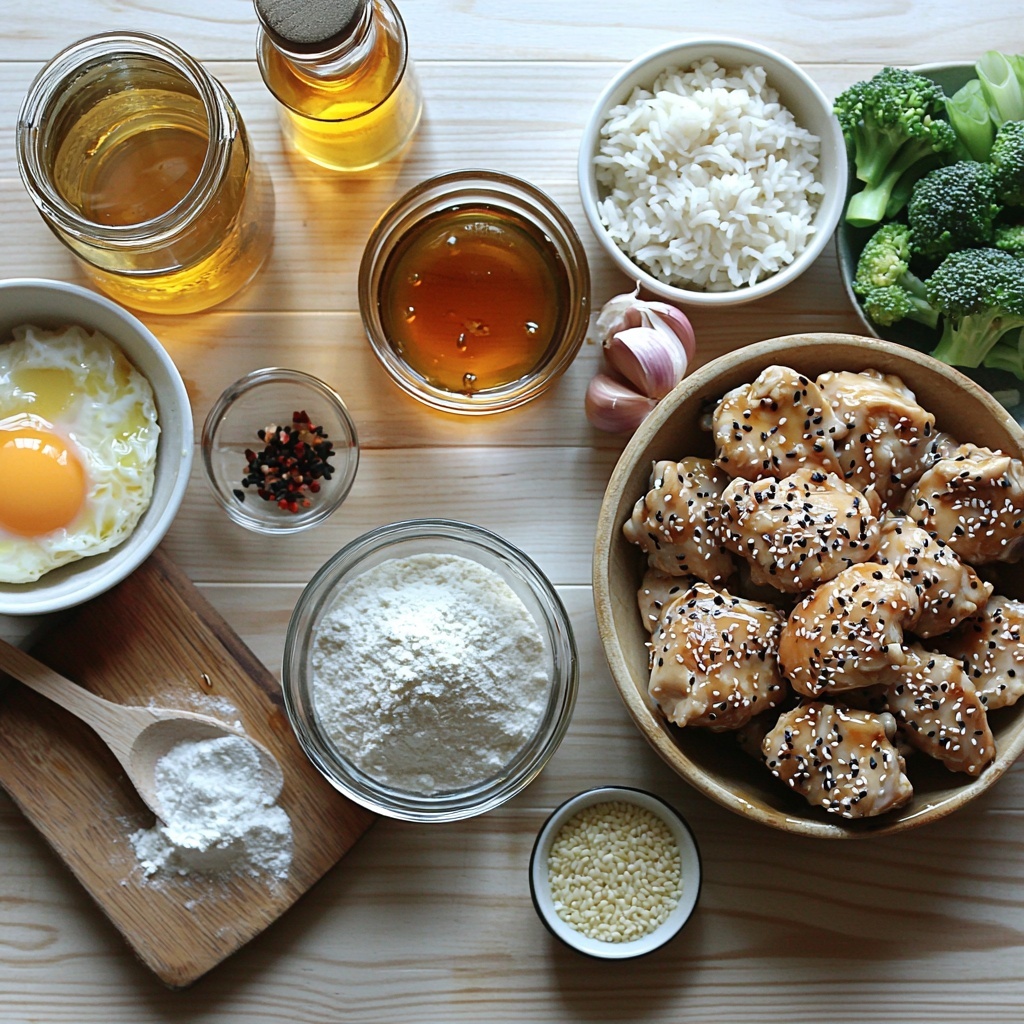
Ingredients You’ll Need
Each ingredient in this sesame chicken recipe is thoughtfully included to create the ideal texture and vibrant taste. From the crispy chicken coating to the rich, sticky sauce, these pantry staples come together in perfect harmony.
- 2 lbs boneless, skinless chicken thighs, cut into 1-inch pieces: Chicken thighs stay juicy and tender, perfect for frying.
- 1 cup all-purpose flour: Provides the base for a crisp coating that locks in moisture.
- 1/2 cup cornstarch: Ensures a light, crisp texture by giving the coating extra crunch.
- 1 teaspoon baking powder: Adds a little lift and airiness to the crispy exterior.
- 1 teaspoon salt: Essential for seasoning and bringing out the flavors.
- 1/2 teaspoon black pepper: Adds subtle spice and balances the dish.
- 2 large eggs, beaten: Acts as a glue to help the flour mixture cling to the chicken.
- 1/2 cup water: Mixed with the eggs to create a perfect wet batter.
- Vegetable oil, for frying: Neutral oil with a high smoke point to crisp the chicken perfectly.
- 1/2 cup soy sauce (low sodium preferred): Brings savory depth and umami to the sauce.
- 1/4 cup honey: The natural sweetness that balances soy sauce’s saltiness for that sticky glaze.
- 1/4 cup rice vinegar: Adds a tangy brightness that lifts the sauce beautifully.
- 2 tablespoons sesame oil: Imparts that classic nutty aroma essential to Asian flavors.
- 2 tablespoons brown sugar, packed: Provides rich sweetness and enhances caramelization.
- 1 tablespoon cornstarch: Used to thicken the sauce to that perfect sticky consistency.
- 1 tablespoon water: Combined with cornstarch to make the slurry for thickening.
- 2 cloves garlic, minced: Fresh garlic gives aromatic pungency and flavor depth.
- 1 teaspoon ginger, grated: Adds a subtle spicy warmth and freshness.
- 1/2 teaspoon red pepper flakes (optional, for heat): A little kick to brighten the flavor if you like heat.
- Sesame seeds: For garnish, adding texture and visual appeal.
- Chopped green onions: Adds freshness and a mild oniony crunch as garnish.
- Cooked white rice, for serving: The perfect fluffy base to soak up all the sauce.
- Steamed broccoli, for serving: Adds color, nutrition, and a fresh vegetable contrast.
How to Make Sesame Chicken: Sticky Asian Sauce Recipe You’ll Love Recipe
Step 1: Prepare the Chicken Pieces
Start by cutting your chicken thighs into uniform 1-inch pieces for even cooking. Then, pat the pieces dry with paper towels; this simple step helps the flour mixture stick better and creates an irresistibly crispy crust.
Step 2: Combine Dry Ingredients
Whisk together all-purpose flour, cornstarch, baking powder, salt, and pepper in a large bowl. The cornstarch lightens the coating while the baking powder adds a subtle lift, ensuring your chicken bites have the perfect crunch every time.
Step 3: Prepare the Wet Ingredients
In a separate bowl, beat the eggs together with water to make an egg wash. This sticky mix is essential for helping the dry mixture cling tightly to the chicken, building that crispy crust layer.
Step 4: Coat the Chicken
Dip each piece of chicken fully into the egg wash, then dredge it in the flour mixture, pressing gently to adhere well. Shake off any excess flour. This double coating technique locks in moisture and guarantees crunchiness.
Step 5: Heat the Oil
Pour enough vegetable oil into a deep skillet or pot to a depth of about 2 inches and heat it to 350°F (175°C). Using a thermometer here is key—a perfectly heated oil crisps the exterior quickly without soaking the chicken in oil.
Step 6: Fry the Chicken in Batches
Carefully add chicken pieces to the hot oil, frying in batches to avoid crowding, which can drop the oil temperature and cause sogginess. Fry each batch for 5-7 minutes until golden brown and cooked through, reaching an internal temperature of 165°F (74°C).
Step 7: Remove and Drain
Using a slotted spoon, transfer the chicken to a wire rack lined with paper towels. This draining step ensures that excess oil is removed and the chicken stays crispy.
Step 8: Combine Sauce Ingredients
In a medium saucepan, whisk together soy sauce, honey, rice vinegar, sesame oil, and brown sugar. This blend creates the backbone of the sticky sauce: sweet, savory, and tangy all at once.
Step 9: Add Aromatics
Stir in the minced garlic and grated ginger to the saucepan. Fresh aromatics like these bring depth and a warmly fragrant character to your sauce.
Step 10: Thicken the Sauce
Make a slurry by mixing cornstarch and water in a small bowl. Slowly whisk this into the saucepan, which will help thicken the sauce into that glossy, clingy consistency that coats the chicken beautifully.
Step 11: Cook the Sauce
Simmer over medium heat for 2-3 minutes, stirring constantly, until thickened. Add red pepper flakes if using to introduce a gentle spicy heat that balances the sweetness.
Step 12: Taste and Adjust
Always taste your sauce and tweak as needed. Add more honey if you want it sweeter, rice vinegar for extra tang, or soy sauce for more depth. This personal touch makes the recipe truly yours.
Step 13: Combine Chicken and Sauce
Transfer your crispy fried chicken into the saucepan, tossing carefully to coat every piece in that irresistible sticky Asian sesame sauce. Make sure each bite is dripping with flavor.
Step 14: Heat Through
Cook together for another 1-2 minutes, stirring occasionally, so the chicken heats through and the sauce glazes perfectly onto every piece.
Step 15: Garnish and Serve
Plate your sesame chicken and sprinkle liberally with toasted sesame seeds and chopped green onions for a vibrant finishing touch.
Step 16: Serve Immediately
Serve hot over a bed of fluffy white rice with steamed broccoli on the side. The contrast of textures and flavors here makes every bite truly special.
How to Serve Sesame Chicken: Sticky Asian Sauce Recipe You’ll Love Recipe
Garnishes
A sprinkle of sesame seeds adds a delightful crunchy pop and nutty aroma that complements the sauce perfectly. Bright green onions add fresh flavor and color, elevating the dish visually and taste-wise.
Side Dishes
Soft, steamed broccoli provides a lovely balance of texture and nutrition, while fluffy white rice is ideal for soaking up that irresistibly sticky sesame sauce. Together, they complete the meal beautifully.
Creative Ways to Present
For a fun twist, serve the sesame chicken in lettuce cups or wrap it with thin cucumber slices for a lighter, refreshing bite. You can also sprinkle chopped toasted peanuts for extra texture or pair with pickled vegetables to cut through the sweetness.
Make Ahead and Storage
Storing Leftovers
Refrigerate any leftover sesame chicken in an airtight container for up to 3-4 days. This helps retain freshness and keeps the chicken flavorful for enjoying later without losing too much crispiness.
Freezing
You can freeze the cooked chicken and sauce separately in airtight containers for up to 1 month. Freeze chicken on a baking sheet before transferring to containers to prevent clumping. Thaw overnight in the fridge before reheating.
Reheating
Reheat leftovers gently in a skillet over medium heat so the chicken regains some crispiness while warming the sauce through. Avoid microwaving when possible, as it can make the chicken soggy.
FAQs
Can I use chicken breasts instead of thighs?
Absolutely! Chicken breasts work fine, though thighs tend to stay juicier and more forgiving during frying. Just be careful not to overcook breasts to avoid dryness.
How do I make this recipe gluten-free?
Substitute all-purpose flour in the coating with a gluten-free flour blend and ensure your soy sauce is gluten-free tamari or coconut aminos. The rest of the recipe remains the same.
Is it possible to bake the chicken instead of frying?
Yes! For a lighter version, bake coated chicken pieces at 425°F (220°C) on a wire rack for about 20-25 minutes, flipping halfway, until golden and cooked through. Toss with sauce after baking.
Can I prepare the sauce in advance?
Definitely! The sauce can be made up to 2 days ahead and stored in the fridge. Reheat gently and toss with freshly cooked or reheated chicken when ready to serve.
What is the best way to get a crispy coating?
Patting the chicken dry, using the double coating method with egg wash and flour mixture, and frying at the correct oil temperature are the keys to that perfect crispy exterior.
Final Thoughts
I hope you feel inspired to try this Sesame Chicken: Sticky Asian Sauce Recipe You’ll Love Recipe as soon as possible. It’s a dish that never fails to impress with its crunchy texture and flavorful sauce, bringing a little bit of Asian magic right into your kitchen. Once you make it, you’ll understand why this recipe is a favorite that keeps everyone asking for seconds!
Print
Sesame Chicken: Sticky Asian Sauce Recipe You’ll Love Recipe
- Prep Time: 20 minutes
- Cook Time: 35 minutes
- Total Time: 55 minutes
- Yield: 6 servings
- Category: Main Course
- Method: Frying
- Cuisine: Asian
Description
This Sesame Chicken recipe features crispy fried chicken thighs coated in a sticky, savory, sweet, and tangy Asian-inspired sauce. Paired with steamed broccoli and white rice, it creates a perfect balance of textures and flavors, making it an irresistible family favorite.
Ingredients
Chicken and Coating
- 2 lbs boneless, skinless chicken thighs, cut into 1-inch pieces
- 1 cup all-purpose flour
- 1/2 cup cornstarch
- 1 teaspoon baking powder
- 1 teaspoon salt
- 1/2 teaspoon black pepper
- 2 large eggs, beaten
- 1/2 cup water
- Vegetable oil, for frying
Sauce
- 1/2 cup soy sauce (low sodium preferred)
- 1/4 cup honey
- 1/4 cup rice vinegar
- 2 tablespoons sesame oil
- 2 tablespoons brown sugar, packed
- 1 tablespoon cornstarch
- 1 tablespoon water
- 2 cloves garlic, minced
- 1 teaspoon ginger, grated
- 1/2 teaspoon red pepper flakes (optional, for heat)
Garnish and Serving
- Sesame seeds
- Chopped green onions
- Cooked white rice, for serving
- Steamed broccoli, for serving
Instructions
- Prepare the Chicken Pieces: Cut the chicken thighs into uniform 1-inch pieces to ensure even cooking. Pat them dry with paper towels to help the flour mixture cling better, resulting in crispier chicken.
- Combine Dry Ingredients: In a large bowl, whisk together all-purpose flour, cornstarch, baking powder, salt, and black pepper. The cornstarch and baking powder work together to create a light, crispy coating.
- Prepare the Wet Ingredients: In a separate bowl, whisk the beaten eggs with water to form an egg wash that helps the coating stick to the chicken.
- Coat the Chicken: Dip each chicken piece fully into the egg mixture, then dredge in the flour mixture, pressing lightly to ensure adherence. Shake off excess flour to avoid clumps and achieve an even coating.
- Heat the Oil: Fill a deep skillet or pot with vegetable oil to about 2 inches deep. Heat the oil over medium-high heat until it reaches 350°F (175°C). Using a thermometer helps maintain the ideal frying temperature.
- Fry the Chicken in Batches: Carefully add chicken pieces to the hot oil without overcrowding. Fry each batch for 5-7 minutes until golden brown and cooked through, with an internal temperature of 165°F (74°C).
- Remove and Drain: Use a slotted spoon to remove chicken from oil and place on a wire rack lined with paper towels to drain excess oil and maintain crispiness.
- Combine Sauce Ingredients: In a medium saucepan, whisk together soy sauce, honey, rice vinegar, sesame oil, and brown sugar to create a balanced sweet-savory base.
- Add Aromatics: Stir in minced garlic and grated ginger to infuse the sauce with depth and warmth.
- Thicken the Sauce: Mix cornstarch and water in a small bowl to make a slurry, then gradually whisk it into the saucepan to thicken the sauce.
- Cook the Sauce: Bring the sauce to a simmer over medium heat, stirring constantly until it thickens, about 2-3 minutes. Optionally add red pepper flakes for heat.
- Taste and Adjust: Sample the sauce and tweak sweetness, tanginess, or saltiness by adding more honey, rice vinegar, or soy sauce to your preference.
- Combine Chicken and Sauce: Add the fried chicken pieces to the thickened sauce and toss gently to coat every piece with the sticky glaze.
- Heat Through: Cook for an additional 1-2 minutes while stirring occasionally to ensure the chicken is heated and the sauce is well-glazed.
- Garnish and Serve: Transfer the coated chicken to a serving platter or bowls. Sprinkle generously with sesame seeds and chopped green onions for added flavor and visual appeal.
- Serve Immediately: Serve hot over steamed white rice and alongside steamed broccoli to enjoy the full combination of textures and flavors.
Notes
- Patting the chicken dry before coating is essential for a crispy texture.
- Maintain oil temperature at 350°F to avoid greasy chicken.
- Do not overcrowd the frying pan; this keeps the oil temperature steady and ensures even frying.
- The sauce can be adjusted for sweetness or heat by modifying honey and red pepper flakes.
- Leftover chicken and sauce can be stored separately in the fridge for up to 2 days.
- Using low sodium soy sauce helps control the saltiness of the dish.


