
If you’re searching for a delightfully unique, crowd-pleasing treat, the Banana Pudding Cheesecake Cones Recipe is an absolute game-changer. Imagine creamy banana cheesecake filling nestled inside crunchy graham cracker cones—each bite bursting with smooth, sweet, and slightly tangy flavors that perfectly marry the nostalgic charm of banana pudding with the indulgent richness of cheesecake. This recipe is wonderfully simple yet impressive, making it ideal for summer gatherings, cozy family nights, or a special dessert surprise to brighten anyone’s day.
Ingredients You’ll Need
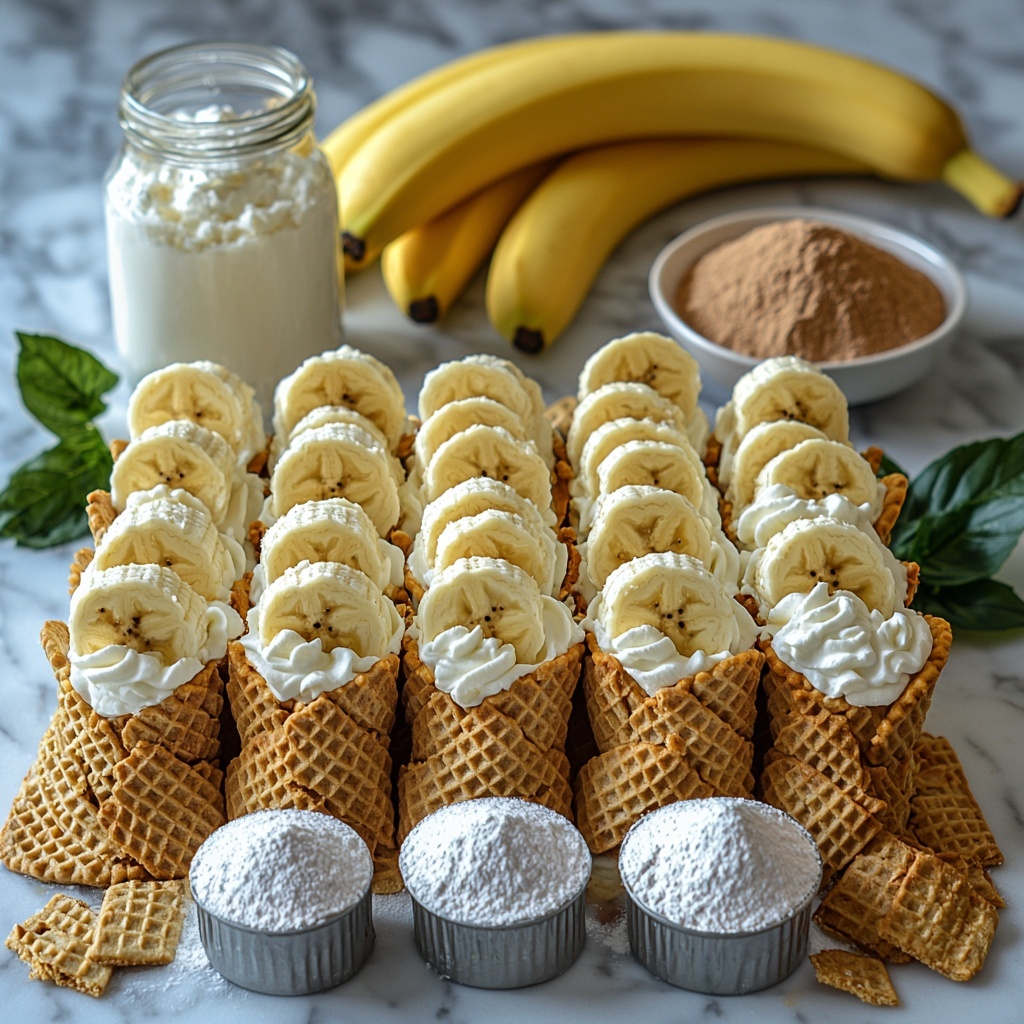
Simple ingredients are the best kind, especially when they all play a crucial role in delivering that perfect balance of flavor and texture in the Banana Pudding Cheesecake Cones Recipe. Each component contributes something special, from the creamy base to the tender sweetness of bananas and the delightful crunch of the cones.
- 6 graham cracker cones: These provide a crunchy, sweet vessel that contrasts beautifully with the creamy filling.
- 2 ripe bananas, mashed (about 1 cup): They add natural sweetness and that classic banana pudding flavor you crave.
- 8 oz cream cheese, softened: The rich and tangy base that makes the filling luxuriously smooth.
- 1 cup powdered sugar: Adds just the right level of sweetness without any graininess.
- 2 tsp vanilla extract: Brings warmth and depth to every spoonful of the mixture.
- 1 cup whipped topping: Lightens the filling for a fluffy, cloud-like texture that keeps the cones from feeling too heavy.
- ½ tsp ground cinnamon (optional): A subtle hint of spice that complements the bananas perfectly if you decide to include it.
How to Make Banana Pudding Cheesecake Cones Recipe
Step 1: Preparing the Creamy Banana Cheesecake Mixture
Start by blending the softened cream cheese, powdered sugar, vanilla extract, and mashed bananas in a mixing bowl until the mixture is smooth and creamy. This will take about 3 to 5 minutes—don’t rush this part because the texture of your filling depends on it being perfectly smooth and well combined.
Step 2: Folding in the Whipped Topping
Next, gently fold in the whipped topping using a spatula. This step is key to keeping the mixture light and airy, so take your time folding rather than stirring vigorously to avoid deflating the fluffy whipped topping.
Step 3: Filling the Graham Cracker Cones
Fill each graham cracker cone generously with your banana cheesecake mixture. Using a piping bag gives you neat, beautiful cones, but a spoon works just as well if you’re more about rustic charm. Make sure the filling is packed enough to hold its shape but soft enough to enjoy easily.
Step 4: Adding the Final Touches
Top your filled cones with some crushed graham crackers or thin banana slices for an extra burst of texture and flavor. These little garnishes elevate the experience by adding a hint of crunch or fresh fruitiness on top.
Step 5: Chill to Perfection
Place the filled cones upright in the refrigerator and chill for at least 30 minutes. This chilling step allows the flavors to meld beautifully and firms up the filling for a perfectly satisfying bite every time.
How to Serve Banana Pudding Cheesecake Cones Recipe
Garnishes
Enhance your Banana Pudding Cheesecake Cones Recipe with garnishes like toasted coconut flakes, tiny sprinkles of cinnamon, or even a drizzle of caramel sauce. These little extras not only add a pop of color but also introduce layers of flavor and texture that make the treat feel even more special.
Side Dishes
While these cones are delicious on their own, pairing them with fresh fruit salad, a scoop of vanilla ice cream, or a simple cup of mixed berries can create a more rounded dessert plate and brighten the palate after each creamy bite.
Creative Ways to Present
Get creative by serving your Banana Pudding Cheesecake Cones Recipe in a stand of empty wine bottles, or place them upright in a colorful bowl filled with sugar or crumbled graham crackers to keep them steady. For a party, display them on a tiered tray with a few fresh banana leaves for a tropical vibe.
Make Ahead and Storage
Storing Leftovers
Leftover cheesecake cones should be stored in an airtight container in the refrigerator to keep the filling fresh and the cones from becoming soggy. It’s best to enjoy them within 2 days to savor that perfect texture.
Freezing
Freezing is not recommended for this Banana Pudding Cheesecake Cones Recipe because the delicate cream cheese and banana filling may separate or become icy on thawing, compromising the smooth, creamy texture.
Reheating
Since these cones are served chilled, there’s no need to reheat. Just take them out of the refrigerator about 10 minutes before serving to let them soften slightly for a perfectly creamy experience.
FAQs
Can I use fresh bananas each time?
Absolutely! Using fresh ripe bananas is essential to achieve that natural sweetness and perfect banana flavor in the Banana Pudding Cheesecake Cones Recipe. Just be sure they are very ripe for the best taste and smooth texture.
What if I don’t have graham cracker cones?
No worries! You can substitute waffle cones or even serve the banana pudding cheesecake mixture in small cups or jars for a fun twist on the presentation.
Is there a dairy-free version of this recipe?
Yes, you can swap cream cheese and whipped topping for their dairy-free counterparts, such as vegan cream cheese and coconut whipped cream, to create a delicious allergy-friendly Banana Pudding Cheesecake Cones Recipe.
Can this recipe be doubled for a larger crowd?
Definitely. The ingredients scale easily, so doubling or even tripling the recipe will work well for parties or larger gatherings. Just make sure you have enough cones and a big enough bowl for mixing!
How long should I chill the cones before serving?
Chilling them for at least 30 minutes is ideal to allow the filling to set nicely. If you can wait longer, an hour or two in the refrigerator will make them even easier to handle and more refreshing.
Final Thoughts
If you want to impress your friends or family with a dessert that feels both nostalgic and fresh, you really can’t go wrong with the Banana Pudding Cheesecake Cones Recipe. It’s simple, fun to make, and the perfect balance of creamy and crunchy—the kind of treat you’ll find yourself craving again and again. I can’t wait for you to try it and hear all about your own delicious twists!
Print
Delicious Recipe
- Prep Time: 15 minutes
- Cook Time: 0 minutes
- Total Time: 45 minutes
- Yield: 6 servings
- Category: Dessert
- Method: No-Cook
- Cuisine: American
- Diet: Vegetarian
Description
Delight in these easy-to-make Banana Pudding Cheesecake Cones that combine creamy banana-infused cheesecake filling with crunchy graham cracker cones, perfect for a no-bake, refreshing dessert.
Ingredients
Cheesecake Filling
- 8 oz cream cheese, softened
- 1 cup powdered sugar
- 2 tsp vanilla extract
- 2 ripe bananas, mashed (about 1 cup)
- 1 cup whipped topping
- ½ tsp ground cinnamon (optional)
Assembly
- 6 graham cracker cones
- Crushed graham crackers or banana slices for topping
Instructions
- Prepare the cheesecake mixture: In a mixing bowl, combine the softened cream cheese, powdered sugar, vanilla extract, and mashed bananas. Mix well until the mixture is smooth and creamy, which should take about 3-5 minutes using an electric mixer or vigorous whisking.
- Fold in whipped topping: Gently fold the whipped topping into the cheesecake mixture to maintain its light and fluffy texture. Be careful not to overmix to keep the mixture airy.
- Fill the cones: Using a piping bag or spoon, carefully fill each graham cracker cone with the banana cheesecake mixture, filling them generously but avoiding overfilling to prevent spills.
- Add toppings: Top each filled cone with crushed graham crackers or fresh banana slices to add texture and extra banana flavor.
- Chill the cones: Place the filled cones upright in the refrigerator and chill them for at least 30 minutes to allow the filling to set and flavors to meld before serving.
Notes
- Use ripe bananas for sweeter and more flavorful filling.
- Chilling the cones helps the filling firm up for better handling and presentation.
- The optional ground cinnamon adds a warm spice note that complements the banana flavor.
- Serve immediately after chilling to prevent the cones from becoming soggy.
- These cones are best consumed within 24 hours for optimal freshness.
