
If you have a soft spot for that perfect combo of sweet, tart cherries nestled in a buttery, tender crust, then you are going to fall head over heels for this Cherry Pie Bars Recipe. Imagine all the comforting, nostalgic flavors of a classic cherry pie but in an easy-to-make bar form that’s perfect for sharing at any gathering or simply treating yourself. This Cherry Pie Bars Recipe brings together simple ingredients and straightforward steps to create a dessert that’s bursting with juicy cherry filling and a golden, melt-in-your-mouth crust. Whether you’re new to baking or a seasoned pro, this recipe is a surefire way to impress with minimal fuss.
Ingredients You’ll Need
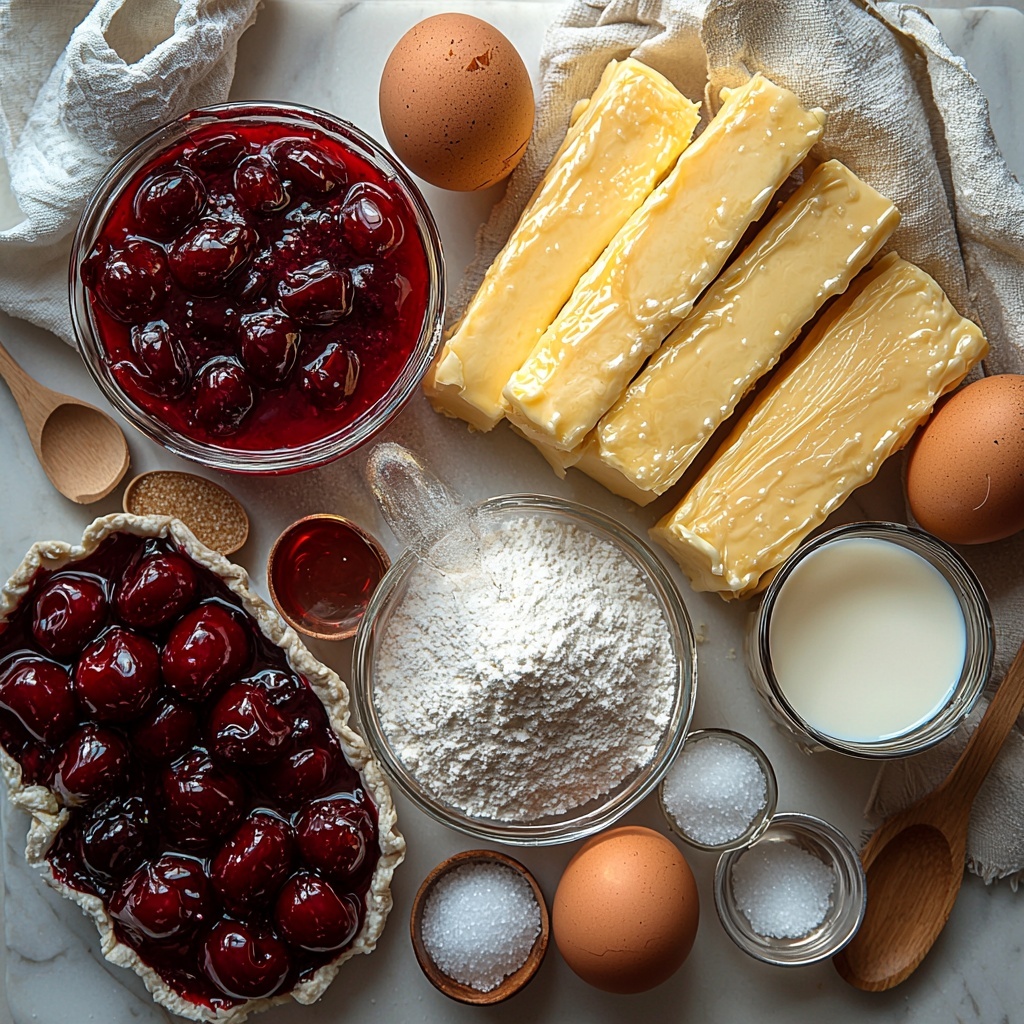
These ingredients are all pantry staples that come together beautifully to create the perfect balance of flavors and textures in your Cherry Pie Bars Recipe. Each one plays a key role from the rich, buttery base to the luscious cherry filling that makes this treat irresistible.
- 2 sticks of butter: Softened to blend easily, adding richness and a tender crumb to the bars.
- 2 cups of sugar: Sweetens the dough and balances the tartness of the cherries perfectly.
- 2 eggs: Provide structure and moisture for that soft yet sturdy bar texture.
- Pinch of salt: A tiny touch that enhances all the flavors without being noticeable on its own.
- 1 teaspoon vanilla extract: Brings warmth and depth to the dough’s flavor.
- 3 cups all-purpose flour: The foundation that gives the bars their lovely chew and shape.
- 1 teaspoon baking powder: Helps the dough rise just enough for a soft bite without being cakey.
- 1/4 cup milk: Adds moisture and ensures the dough is smooth and spreadable.
- 2 cans of cherry pie filling: The star of the show—the sweet and tart cherries make these bars unforgettable.
- Extra sugar for sprinkling: Adds a delightful crunch and a little sparkle on top.
- Extra flour for pressing dough into the dish: Prevents the dough from sticking during assembly.
How to Make Cherry Pie Bars Recipe
Step 1: Prepare Your Oven and Pan
Start by preheating your oven to 350°F (175°C). Then grease and flour a 9×13-inch baking dish thoroughly. This step ensures your bars will release easily after baking and that the edges get beautifully crisp without sticking, making slicing a breeze.
Step 2: Make the Dough
In a large bowl, cream together the softened butter, sugar, eggs, and vanilla extract until the mixture is light and fluffy. This is where the magic begins—this creaming process incorporates air into your dough, resulting in bars that practically melt in your mouth. Next, whisk together the flour, salt, and baking powder, then add them gradually to the wet mixture. Finish by blending in the milk to get a smooth, thick batter that’s ready to be spread.
Step 3: Form the Base Layer
Take half of your dough and spread it evenly into the bottom of your prepared pan. Since the mixture is thick, dip your spoon in a little flour to help spread it without it sticking to your utensil. You want an even layer to create a sturdy base that will hold all that delicious cherry filling.
Step 4: Add the Cherry Filling
Sprinkle a little sugar over the base layer for an extra touch of sweetness, then open your cans of cherry pie filling. Pour both cans evenly across the dough, making sure the cherries cover the entire surface. Lightly sprinkle sugar over the top again to enhance the caramelization during baking.
Step 5: Top the Filling with Remaining Dough
Drop spoonfuls of the remaining dough over the cherry layer. This doesn’t have to be perfect—think rustic and charming! Use the back of a spoon or even your fingers to gently pat the dough patches so they cover as much cherry filling as possible. Some cherry peeking through is part of the appeal here.
Step 6: Bake Until Golden and Bubbling
Give the top a final sprinkle of sugar, then place the dish in your preheated oven. Bake for about 35 to 45 minutes. You’ll know it’s done when the top is a gorgeous golden brown and you can see the cherry filling bubbling excitedly around the edges. Insert a toothpick in the dough parts to check that it comes out clean for perfection.
Step 7: Cool and Slice
Once out of the oven, let your cherry pie bars cool in the pan for at least 30 minutes. This cooling step lets the filling set, making the bars easier to slice. For the neatest slices, pop the entire pan in the fridge before cutting. Serve them warm for a comforting treat or chilled for a refreshing dessert.
How to Serve Cherry Pie Bars Recipe
Garnishes
Brighten up your bars with a dusting of powdered sugar or a drizzle of freshly whipped cream to add creamy contrast. You could also sprinkle some toasted almond slices or add a scoop of vanilla ice cream on the side for an indulgent finish that’s sure to wow guests.
Side Dishes
These bars are delightful on their own but pair beautifully with light, fruity salads or a cup of herbal tea to balance the sweetness. For brunch or gatherings, serve alongside fresh berries or citrusy sorbet to keep things fresh and exciting.
Creative Ways to Present
Try cutting these bars into smaller squares or even mini bites for parties—they’re perfect finger food. Serve them on a rustic wooden board with fresh mint leaves for a pop of color, or arrange on pretty dessert plates topped with a raspberry coulis drizzle to take your Cherry Pie Bars Recipe to the next level.
Make Ahead and Storage
Storing Leftovers
Store any leftover cherry pie bars in an airtight container at room temperature for up to two days. If you want them to last longer, refrigeration will keep them fresh for about 5 days. Just be sure to let the bars come to room temperature before serving for the best flavor and texture.
Freezing
You can absolutely freeze these bars to enjoy later. Wrap individual bars in plastic wrap and place them in a freezer-safe container or zip-top bag. They keep well for up to 3 months. When you’re ready to indulge, thaw them overnight in the fridge.
Reheating
To bring your cherry pie bars back to their fresh-baked glory, warm them gently in a 300°F oven for 10-15 minutes, or microwave for 20-30 seconds. This softens the crust and revives the gooey cherry filling, making them taste just like the moment they came out of your oven.
FAQs
Can I use fresh cherries instead of canned pie filling?
Absolutely! Fresh cherries can be a wonderful alternative, though you’ll want to cook them down with sugar and a bit of cornstarch to replicate the thickness and sweetness of the canned filling. This will maintain the gooey texture you expect in cherry pie bars.
What happens if I cover the bars fully with dough on top?
Covering the filling completely is fine, but the traditional appeal of cherry pie bars is that rustic look with cherry peeking through. Also, a partial top allows the filling to bubble beautifully and caramelize at the edges, adding extra flavor and texture.
Can I substitute butter with margarine or oil?
Butter is best here for flavor and texture, giving the bars their classic rich and tender crumb. Margarine will work in a pinch but might alter the taste slightly. Oil isn’t recommended as it will change the bar’s structure and mouthfeel considerably.
How do I store the bars if I want to keep them crisp on top?
Keep the bars in an airtight container at room temperature. To preserve crispness, place a paper towel inside the container to absorb moisture. Avoid refrigeration if you want to maintain the crunchy texture, as cold can make the dough soggy.
What spices can I add for extra flavor?
Adding a pinch of cinnamon or a hint of almond extract complements cherries beautifully. Just a sprinkle in the dough or stirred into the cherry filling can deepen the flavor profile without overwhelming the classic taste.
Final Thoughts
If you’re searching for a dessert that combines the nostalgic warmth of cherry pie with the ease of bars, this Cherry Pie Bars Recipe is the answer. It’s straightforward, satisfying, and guaranteed to bring smiles at the table. Once you try these, they’ll become one of your go-to recipes for holidays, potlucks, or simply whenever you want a taste of home in every bite. Happy baking!
Print
Cherry Pie Bars Recipe
- Prep Time: 15 minutes
- Cook Time: 40 minutes
- Total Time: 55 minutes
- Yield: 15 servings
- Category: Dessert
- Method: Baking
- Cuisine: American
Description
These Cherry Pie Bars combine a rich, buttery crust with sweet and tangy cherry pie filling, baked to golden perfection. Perfect for a dessert or snack, these bars offer the comforting flavors of traditional cherry pie in an easy-to-slice, shareable format.
Ingredients
For the Crust and Batter
- 2 sticks of butter – softened
- 2 cups sugar
- 2 eggs
- Pinch of salt
- 1 teaspoon vanilla extract
- 3 cups all-purpose flour
- 1 teaspoon baking powder
- 1/4 cup milk
For the Filling and Topping
- 2 cans cherry pie filling
- Extra sugar for sprinkling
- Extra flour for pressing dough into the dish
Instructions
- Preheat and Prepare Pan: Preheat your oven to 350°F (175°C). Grease and flour a 9×13-inch baking dish to prevent sticking and make slicing easier.
- Mix the Batter: In a large bowl, cream together softened butter, sugar, eggs, and vanilla extract until light and fluffy to create a smooth texture. Add flour, salt, and baking powder and mix until smooth. Pour in the milk and blend until fully combined into a thick dough.
- Form the Base Layer: Spread half of the batter evenly across the prepared baking dish’s bottom layer. Use extra flour on your spoon to prevent sticking while spreading.
- Add Cherry Filling: Sprinkle a little sugar over the base layer for extra sweetness. Pour both cans of cherry pie filling evenly over the dough, then sprinkle a bit more sugar on top.
- Top with Remaining Batter: Drop heaping tablespoons of the remaining batter over the cherry filling. Gently spread with the back of a spoon or fingers; the dough need not fully cover the cherries for a rustic look.
- Final Sugar Sprinkle and Bake: Sprinkle more sugar on top before placing the dish in the oven. Bake for 35-45 minutes until the golden crust forms and a toothpick inserted comes out clean; cherry filling should bubble around the edges.
- Cool and Serve: Let bars cool in the pan for at least 30 minutes. For neater slices, chill in the refrigerator before cutting. Serve warm or cold and enjoy!
Notes
- Using softened butter is key for creaming and texture.
- Sprinkling sugar on each layer enhances sweetness and adds a slight crunch on top.
- Flouring your spoon helps spread thick batter without sticking.
- Chilling the bars after baking ensures clean slices.
- You can substitute cherry pie filling with homemade or other fruit fillings if desired.


