
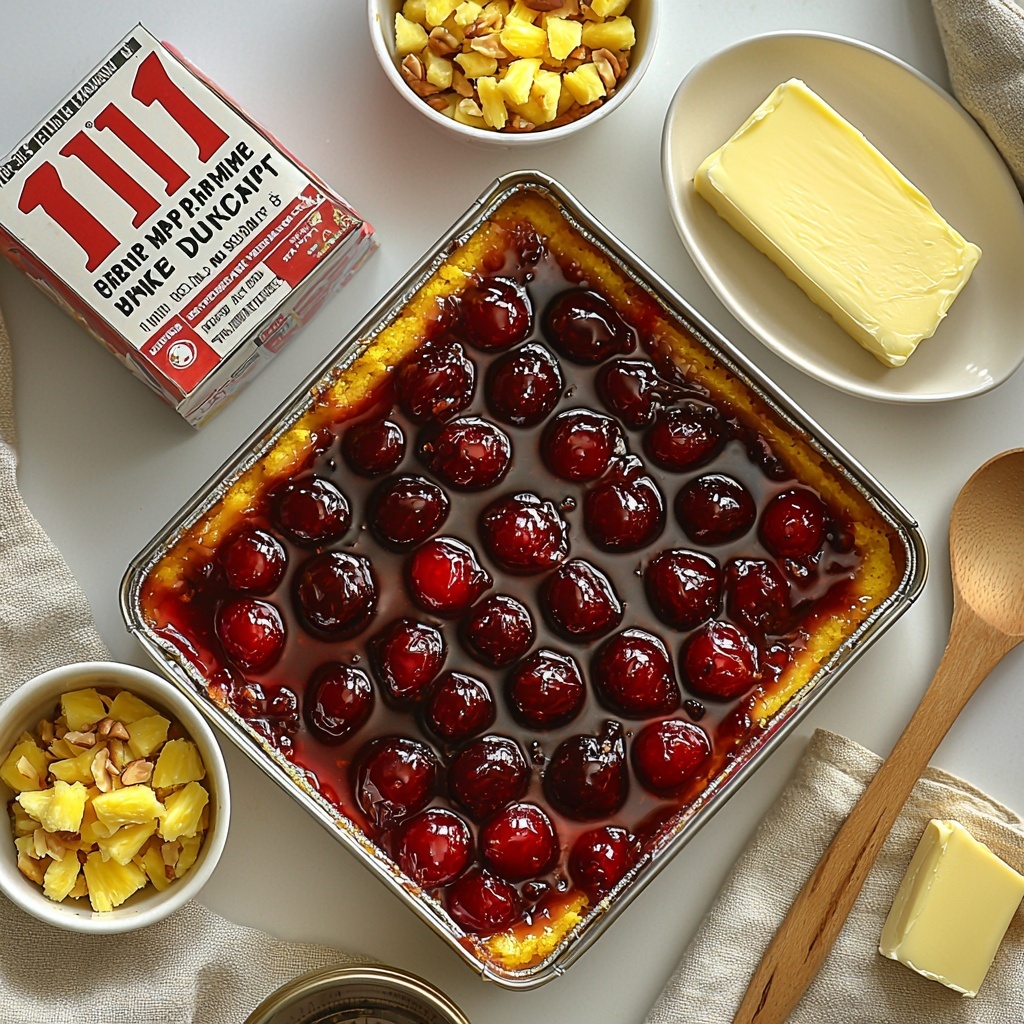
If you love dessert recipes that combine simplicity with irresistible flavors, you are going to fall head over heels for this Cherry Pineapple Dump Cake Recipe. Imagine juicy cherry pie filling and bright crushed pineapple mingling together beneath a golden, buttery cake topping—this dessert is pure comfort in a dish. Its effortless assembly means you can have a crowd-pleasing, luscious treat on the table in about an hour, perfect for sharing or any time you need a touch of joyful sweetness. This Cherry Pineapple Dump Cake Recipe is truly one of those gems that feels like a warm hug with every bite.
Ingredients You’ll Need
Don’t be fooled by the simplicity of these ingredients—each plays a vital role in creating the perfect balance of flavors and textures in your dump cake. From the rich fruit fillings to the buttery cake topping, these easy-to-find essentials work beautifully together to make a show-stopping dessert.
- 1 can (21 oz) cherry pie filling: The star fruit component, bursting with sweet-tart cherries that add that classic pie flavor without any fuss.
- 1 can (20 oz) crushed pineapple (with juice): Adds tropical sweetness and juiciness that keeps the cake wonderfully moist and vibrant.
- 1 box (15.25 oz) yellow cake mix: This forms the luscious, cakey crust on top, creating contrast with the soft fruit below.
- 1/2 cup (1 stick) unsalted butter, thinly sliced: Butter melts into the cake mix, producing that golden, rich, and slightly crispy topping everyone loves.
- 1/2 cup chopped nuts (optional): Adds a delightful crunch and nutty flavor, making each bite even more satisfying (totally optional but highly recommended!).
How to Make Cherry Pineapple Dump Cake Recipe
Step 1: Prepare Your Oven and Dish
First things first—preheat your oven to a cozy 350°F (175°C). While it’s warming up, lightly grease a 9×13-inch baking dish to ensure your cake doesn’t stick and comes out perfectly.
Step 2: Layer the Cherry Pie Filling
Spread the entire can of cherry pie filling evenly across the bottom of your prepared dish. This layer sets the deep red, luscious base that gives the cake its signature fruity charm.
Step 3: Add the Crushed Pineapple
Next, spoon the crushed pineapple, juice and all, right over the cherry layer. The juice joins the cherries to create a juicy, vibrant filling that will soak into the cake topping as it bakes.
Step 4: Sprinkle the Dry Cake Mix
Now, sprinkle your yellow cake mix evenly over the combined fruit layers. Don’t stir! This dry cake mix will absorb the fruit juices and transform into a beautiful, golden crust as it cooks.
Step 5: Top with Butter Slices and Nuts
Arrange thin slices of unsalted butter evenly over the cake mix so it melts throughout the baking, creating that rich, buttery topping. If you’re using nuts, sprinkle them on now for a little extra texture and flavor.
Step 6: Bake Until Golden and Bubbling
Pop your masterpiece into the oven and bake for 50 to 60 minutes. You want the top golden and crispy, with the fruit filling bubbling happily beneath—this signals it’s perfectly cooked and ready to enjoy.
Step 7: Cool Slightly and Serve
Once out of the oven, allow the cake to cool just a bit so it sets but remains warm and inviting. This step helps those layers settle, making it easier to serve and enjoy every spoonful.
How to Serve Cherry Pineapple Dump Cake Recipe
Garnishes
A scoop of creamy vanilla ice cream or a dollop of freshly whipped cream is a match made in heaven alongside this dump cake. The cold cream contrasts with the warm, bubbling fruit, adding a silky finish to every bite. Fresh cherries or a sprinkle of chopped nuts on top add a little extra flair and texture.
Side Dishes
This Cherry Pineapple Dump Cake Recipe shines best as the star dessert, so keep sides light and simple. A cup of hot coffee or a refreshing glass of iced tea pairs beautifully, balancing the sweetness and turning any meal into a delightful occasion.
Creative Ways to Present
For a fun twist, serve the dump cake in individual ramekins or mason jars topped with ice cream and chopped nuts for a charming, rustic look. You can also spoon it over pancakes or waffles for a decadent brunch treat that’s bursting with fruit flavor.
Make Ahead and Storage
Storing Leftovers
Once cooled completely, cover any leftover Cherry Pineapple Dump Cake tightly with plastic wrap or foil and store it in the refrigerator. It will stay fresh and delicious for 3 to 4 days, giving you plenty of time to enjoy those sweet, joyful flavors again.
Freezing
This dump cake freezes wonderfully. Wrap portions tightly in freezer-safe containers or wrap the entire dish well. It can be frozen for up to 2 months—just thaw overnight in the fridge before reheating.
Reheating
To bring leftovers back to life, warm your dump cake in the oven at 350°F for about 15-20 minutes until heated through and bubbly again. You can also microwave individual servings for about 30 seconds to one minute—perfect for a quick, comforting treat.
FAQs
Can I use fresh fruit instead of canned for this Cherry Pineapple Dump Cake Recipe?
Fresh fruit changes the moisture content and texture significantly, so the canned cherry pie filling and crushed pineapple with juice are key for achieving the right consistency and flavor. Using fresh fruit would require adjustments in liquid and sugar, making this recipe less foolproof.
Do I have to add nuts, or can I leave them out?
The nuts are totally optional and can be left out if you prefer a nut-free dessert or want a softer texture. They add a lovely crunch and nuttiness, but the cake is delicious even without them.
Can I make this dump cake gluten-free?
Yes! Simply swap out the yellow cake mix for a gluten-free cake mix option. Be sure the mix is designed for 1-to-1 substitution so your dump cake still bakes up light and tender.
Why do I not stir the layers after adding the cake mix?
Not stirring creates that magical layered effect where the dry cake mix absorbs the fruit juices from below and bakes into a crisp, golden crust. Stirring would create a pudding-like texture, which isn’t the goal here.
What is the best way to serve this dessert warm?
Serve your Cherry Pineapple Dump Cake Recipe warm from the oven with a generous scoop of vanilla ice cream or whipped cream on top. The warm fruit filling paired with cool cream is simply irresistible!
Final Thoughts
There is something incredibly satisfying about how simple ingredients can come together to create such a luscious, comforting dessert, and this Cherry Pineapple Dump Cake Recipe nails it perfectly. Whether you’re making it for a family gathering or a spontaneous treat, it’s sure to bring smiles and create happy memories. Give it a try—you might just find it becoming your new favorite dessert to whip up whenever you crave something sweet and effortless.
Print
Cherry Pineapple Dump Cake Recipe
- Prep Time: 10 minutes
- Cook Time: 50-60 minutes
- Total Time: 1 hour 10 minutes
- Yield: 12 servings
- Category: Dessert
- Method: Baking
- Cuisine: American
Description
Cherry Pineapple Dump Cake is a simple, delightful dessert featuring layers of cherry pie filling and crushed pineapple topped with a yellow cake mix and butter, baked to golden perfection. This easy-to-make recipe is perfect for a quick, crowd-pleasing treat that combines fruity sweetness with a crisp, buttery topping.
Ingredients
Fruit Layers
- 1 can (21 oz) cherry pie filling
- 1 can (20 oz) crushed pineapple (with juice)
Cake Topping
- 1 box (15.25 oz) yellow cake mix
- 1/2 cup (1 stick) unsalted butter, thinly sliced
- 1/2 cup chopped nuts (optional)
Instructions
- Preheat Oven: Preheat your oven to 350°F (175°C) to get it ready for baking the dump cake.
- Prepare Baking Dish: Lightly grease a 9×13-inch baking dish to prevent sticking and make serving easier.
- Layer Cherry Filling: Evenly spread the entire can of cherry pie filling across the bottom of the prepared baking dish to form the first fruit layer.
- Add Pineapple Layer: Pour and spread the crushed pineapple, including its juice, evenly over the cherry filling, creating the second fruit layer.
- Top with Cake Mix: Sprinkle the dry yellow cake mix evenly over the fruit layers, covering them completely.
- Add Butter Slices: Distribute thin slices of unsalted butter evenly across the surface of the cake mix, which will melt during baking and create a golden crust.
- Optional Nut Topping: If desired, sprinkle chopped nuts evenly on top for added texture and flavor.
- Bake the Cake: Bake the assembled layers in the preheated oven for 50 to 60 minutes, until the top is golden brown and the fruit filling is bubbly around the edges.
- Cool and Serve: Allow the cake to cool slightly for easier serving. Serve warm, optionally with ice cream or whipped cream for a comforting dessert experience.
Notes
- You can substitute walnuts or pecans for the chopped nuts or omit nuts completely if preferred.
- For a crispier topping, slightly increase the butter or use cold butter slices.
- Allowing the dump cake to cool for 15-20 minutes helps it set and makes slicing easier.
- This dump cake freezes well; wrap tightly and freeze for up to 2 months.
- For a dairy-free version, replace butter with coconut oil or a vegan butter substitute.


