
There is something truly magical about baking your own loaf of bread at home, especially when it requires minimal effort and turns out wonderfully crusty and soft inside. This Easy No Knead Bread Recipe is an absolute game-changer for anyone intimidated by traditional bread baking techniques. With just a few simple ingredients and some patient rising time, you can enjoy bakery-quality bread fresh from your own oven without ever touching a rolling pin. It’s perfect for beginners and busy home cooks alike who want that warm, homemade bread aroma filling their kitchen.
Ingredients You’ll Need
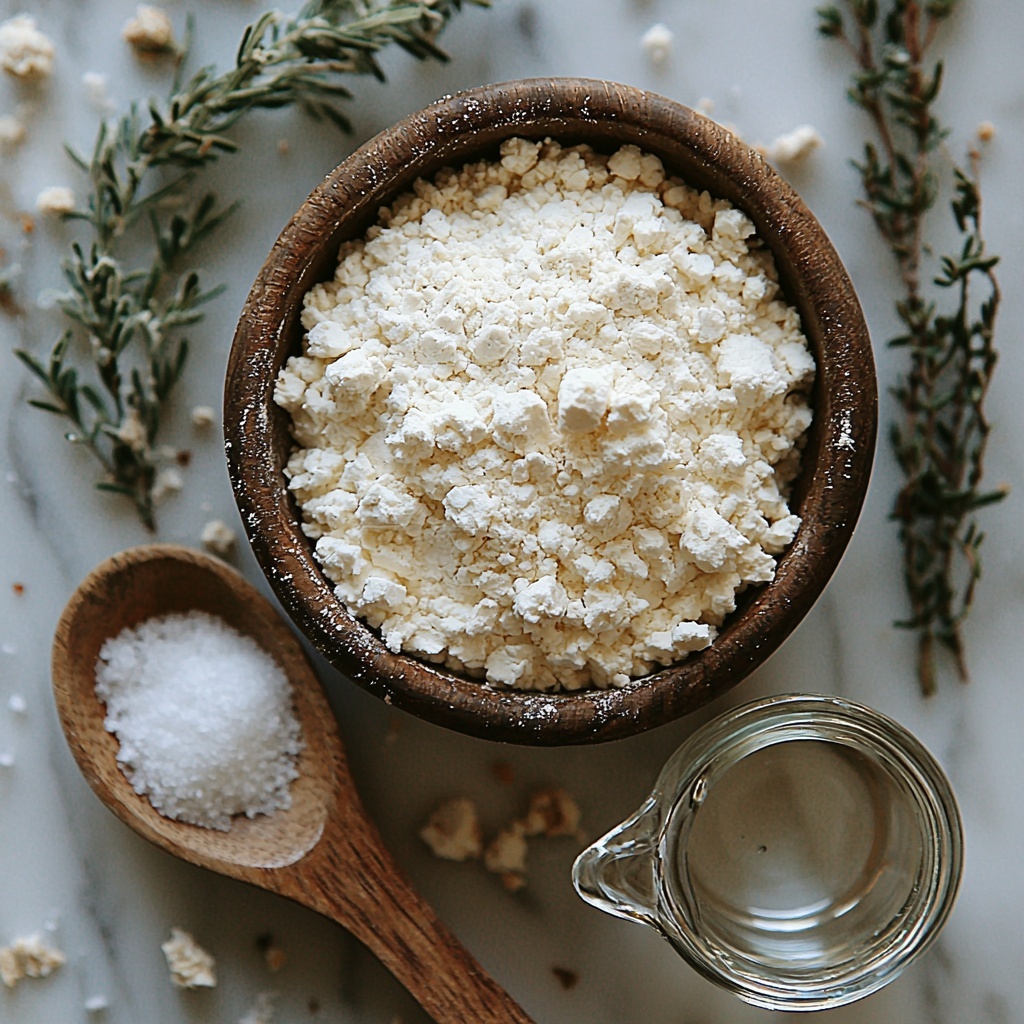
The beauty of this Easy No Knead Bread Recipe lies in its simplicity: just a handful of pantry staples coming together to create irresistible bread with a crust that cracks pleasingly and a tender crumb inside. Each ingredient has a special role to bring balance in flavor, texture, and even aroma.
- 3 cups All-purpose Flour: This is the base of our bread, providing structure and chewiness; using fresh flour makes all the difference.
- 2 teaspoons Salt: Essential for flavor enhancement and controlling yeast activity, it also gives the crust its golden color.
- 2 teaspoons Active dry yeast: The magic leavening agent that helps our bread rise without any kneading.
- 1.5 cups warm water (between 100-110 degrees F): The perfect temperature to activate yeast without killing it, helping the dough ferment beautifully.
How to Make Easy No Knead Bread Recipe
Step 1: Combine Dry Ingredients
Start by mixing your flour, salt, and active dry yeast in a large bowl. Giving these dry ingredients a quick stir ensures that the yeast is evenly distributed throughout the flour, setting a great foundation for your dough.
Step 2: Add Warm Water and Mix
Pour the warm water into your dry mixture and stir until you no longer see any loose flour. Feel free to use your hands here—it’s a lovely tactile experience! Just make sure to stop once all flour is incorporated; the dough will be sticky and shaggy, which is exactly what you want.
Step 3: Let the Dough Rise
Cover the bowl tightly with plastic wrap or a clean kitchen towel and set it somewhere warm for about 2 hours. This hands-off time allows the dough to slowly ferment and develop flavor, turning the simple mix into something truly special.
Step 4: Preheat the Dutch Oven
About 30 minutes before the dough finishes rising, place the lid on your Dutch oven and put it into the oven to preheat at 450 degrees Fahrenheit. Preheating ensures a hot environment for baking, which is crucial for the bread’s crust development.
Step 5: Shape the Dough
Lightly flour a clean surface and gently scoop the risen dough out of the bowl. Form it carefully into a round loaf; remember, we’re not kneading here, just shaping. A quick score on top with a sharp knife allows the bread to expand beautifully while baking.
Step 6: Transfer Dough to Dutch Oven and Bake
Place your dough on a large piece of parchment paper, then carefully remove the hot Dutch oven from the oven. Lift the parchment with the dough and place it inside the pot. Cover with the lid and bake for 30 minutes to trap the steam, which creates that fantastic crust.
Step 7: Finish Baking Uncovered
After the initial 30 minutes, remove the lid and continue to bake the bread for another 15 minutes. This final step helps the crust become deepen to a rich golden brown and extra crispy.
Step 8: Cool Completely Before Slicing
Transfer your bread to a cooling rack or clean countertop, and let it cool fully. Patience here is key because slicing too soon can make the bread gummy. Once cooled, you’ll be rewarded with a loaf that’s crusty on the outside and soft on the inside.
How to Serve Easy No Knead Bread Recipe
Garnishes
This bread is terrific as-is, but a light brush of melted butter or extra virgin olive oil right after baking enhances the crust’s flavor. For special occasions, sprinkle coarse sea salt or fresh rosemary on top before baking for an aromatic twist.
Side Dishes
Because of its neutral yet satisfying flavor, this bread pairs marvelously with soups, stews, and vibrant salads. Try it alongside a bowl of homemade tomato basil soup or a rich beef stew to soak up all those delicious juices.
Creative Ways to Present
Toast thick slices and build open-faced sandwiches layered with avocado, tomato, and smoked salmon. You can also slice it thinly, toast, and serve with a selection of cheeses and charcuterie for an inviting appetizer board that guests will rave about.
Make Ahead and Storage
Storing Leftovers
If you have leftover bread, keep it wrapped tightly in a clean kitchen towel or paper bag on the counter to maintain its crust. Avoid plastic wrap for short-term storage as it can soften the crust too quickly.
Freezing
This bread freezes beautifully! Slice it first for convenience, then store slices in an airtight freezer bag. When you want a fresh slice, just pop it straight into the toaster or oven from frozen.
Reheating
Reheat your bread in an oven preheated to 350°F for about 10 minutes to bring back that fresh-from-the-oven crunch, or toast slices individually. Avoid microwaving, which can make the bread chewy or soggy.
FAQs
Can I use whole wheat flour in this Easy No Knead Bread Recipe?
Absolutely! You can substitute up to half the all-purpose flour with whole wheat flour for a nuttier flavor and denser crumb, but the dough may require a bit more water to stay sticky.
Do I need a Dutch oven to make this bread?
While a Dutch oven is ideal to create the perfect crust, you can use any heavy oven-safe pot with a lid. If you don’t have one, baking the dough on a preheated baking stone covered with a large metal bowl works too.
How long does it take for the dough to rise?
This recipe calls for about 2 hours for the dough to rise at room temperature. Warmer environments may speed this up, and cooler spots will lengthen the process, so keep an eye on it until it roughly doubles in size.
Can I add herbs or other flavorings to the dough?
Definitely! Adding fresh herbs, garlic, or even cheese can elevate this simple bread. Just gently fold your add-ins in the mixing stage before the dough rises.
Why does the dough not require kneading?
This bread is designed to develop gluten over time through a long fermentation process rather than manual kneading. The sticky, wet dough encourages gluten strands to form naturally, resulting in a tender crumb and great texture.
Final Thoughts
Once you try this Easy No Knead Bread Recipe, I promise you’ll be hooked on the magic of creating homemade bread without the fuss. It’s a warm, welcoming loaf that feels like a hug from your kitchen, perfect for everything from casual sandwiches to elegant dinners. So grab your ingredients and dive in—you won’t regret it!
Print
Easy No Knead Bread Recipe
- Prep Time: 10 minutes
- Cook Time: 45 minutes
- Total Time: 2 hours 55 minutes
- Yield: 12 servings
- Category: Bread
- Method: Baking
- Cuisine: American
Description
This Easy No Knead Bread recipe yields a delicious, crusty loaf with minimal effort and no kneading required. Using simple ingredients and a hands-off rising method, this bread is perfect for beginners and seasoned bakers alike. Baked in a preheated Dutch oven, it results in a beautiful golden crust and soft, airy interior.
Ingredients
Dry Ingredients
- 3 cups all-purpose flour
- 2 teaspoons salt
- 2 teaspoons active dry yeast
Wet Ingredients
- 1.5 cups warm water (between 100–110 degrees F)
Instructions
- Combine Dry Ingredients: In a large bowl, mix the all-purpose flour, salt, and active dry yeast together until evenly distributed.
- Add Water and Mix Dough: Heat water to between 100-110 degrees Fahrenheit. Pour the warm water into the dry ingredients and stir with a spoon or use your hands to gently incorporate all the flour until a shaggy dough forms. Do not overwork the dough.
- Let Dough Rise: Cover the bowl with plastic wrap or a clean kitchen towel and place it in a warm spot to let the dough rise for 2 hours, allowing it to double in size.
- Preheat Dutch Oven: Thirty minutes before the dough finish rising, place the lid on your Dutch oven and set it in your oven. Preheat the oven to 450°F (232°C) with the Dutch oven inside to create a hot baking environment.
- Shape Dough: Once the dough has risen, lightly flour a flat surface and carefully transfer the dough onto it. Gently form the dough into a round loaf shape, being careful not to deflate it too much. Lightly score the top with a sharp knife to allow expansion during baking.
- Prepare for Baking: Place the dough on a large sheet of parchment paper for easy transfer into the Dutch oven.
- Bake Covered: Using oven mitts, remove the hot Dutch oven from the oven. Lift the dough with the parchment paper and carefully place it into the Dutch oven. Cover with the lid and return it to the oven to bake for 30 minutes. This traps steam to develop a crispy crust.
- Bake Uncovered: After 30 minutes, remove the lid from the Dutch oven and continue baking the bread for an additional 15 minutes to brown the crust deeply and crisp it up.
- Cool Bread: Remove the Dutch oven from the oven and carefully lift the bread out using the parchment paper. Place the bread on a cooling rack or countertop and let it cool completely before slicing, allowing the crumb to set.
Notes
- Maintaining water temperature between 100-110°F is important to activate the yeast effectively.
- Do not knead the dough; minimal mixing and gentle handling preserve the bread’s airy texture.
- The Dutch oven must be preheated to create steam which is key to developing a crisp crust.
- Allow the bread to cool completely before slicing to ensure the best crumb structure.
- You can store leftover bread in an airtight container at room temperature for up to 3 days or freeze for longer storage.


