
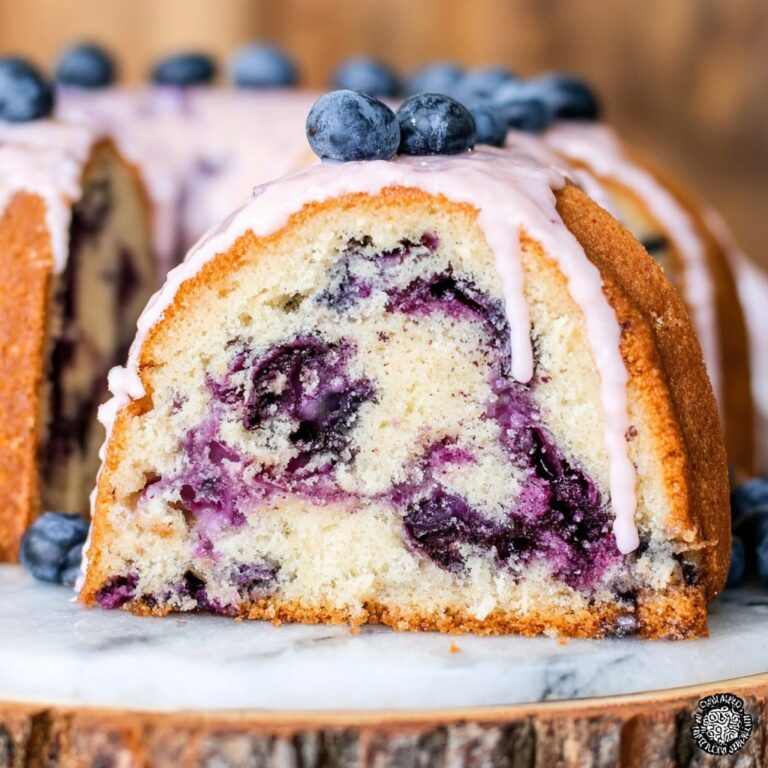
If you’ve ever craved that melt-in-your-mouth, rich decadence of a classic cheesecake, then you’re in for a treat. The New York-Style Cheesecake: The Creamy Classic You’ll Love Recipe is exactly what dreams are made of—a luscious, dense, and velvety dessert that perfectly balances creamy sweetness with a hint of tang. With every bite, you’re greeted by a buttery graham cracker crust that adds a satisfying crunch to the smooth, indulgent filling. It’s the kind of cheesecake that’s both timeless and irresistibly inviting, perfect for celebrations or just-got-to-have-it moments.
Ingredients You’ll Need
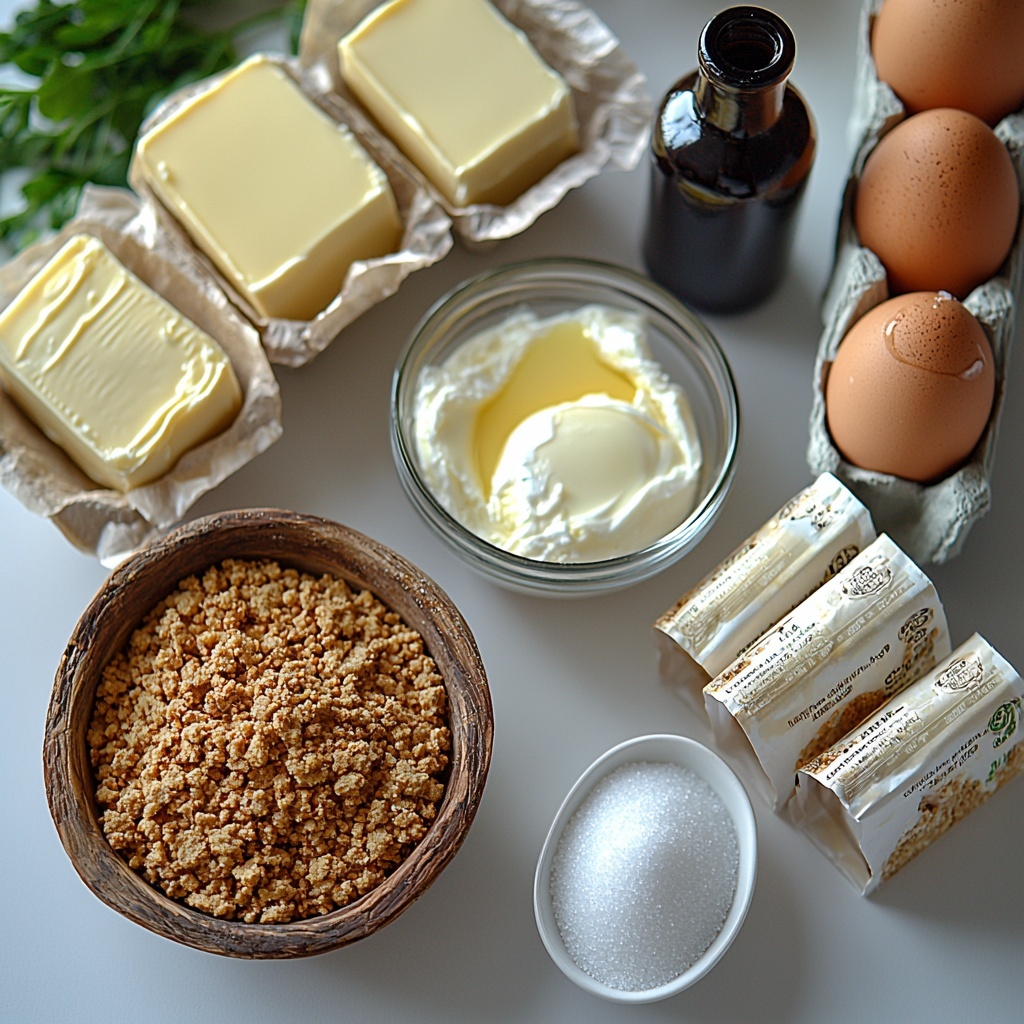
This recipe is beautifully simple, relying on a handful of essential ingredients that create layers of flavor and texture. Each element serves a purpose, from the crunchy base to the creamy filling, harmonizing perfectly to achieve that iconic cheesecake experience.
- 1 cup Graham Cracker Crumbs: Provides a buttery, crunchy foundation; gluten-free options work well for dietary needs.
- ½ cup Unsalted Butter: Adds richness and helps bind the crust; coconut oil is a great dairy-free stand-in.
- ¼ cup Granulated Sugar: Sweetens the crust and enhances caramelization during baking.
- 4 packages Full-Fat Cream Cheese (8 oz each): The star ingredient delivering creamy texture and tangy flavor; lighter alternatives like Neufchâtel cheese can be used.
- 1 cup Full-Fat Sour Cream: Adds a subtle tang and extra creaminess—Greek yogurt can replace it for a lighter variation.
- ¾ cup Granulated Sugar: Sweetens the rich filling, essential for that classic New York-Style finish.
- 2 teaspoons Pure Vanilla Extract: Brings warmth and depth; swap with vanilla bean paste for a more intense flavor.
- 4 large Eggs: Binds the filling and adds structure; make sure they’re at room temperature for best mixing results.
How to Make New York-Style Cheesecake: The Creamy Classic You’ll Love Recipe
Step 1: Prepare the Crust
Begin by preheating your oven to 350°F (175°C). Mix the graham cracker crumbs with melted butter and ¼ cup of sugar in a bowl until the mixture is well blended. Press this mixture firmly into the bottom of a springform pan, creating an even layer that will become the crunchy base for your cheesecake.
Step 2: Bake the Crust
Place the pan with the crust into the oven and bake for 10 minutes, just until it turns a light golden color. This pre-baking step seals the crust, ensuring it stays crisp and sets a solid foundation. After baking, remove the crust and let it cool completely before adding the filling.
Step 3: Craft the Creamy Filling
In a large mixing bowl, beat the softened cream cheese until it is impeccably smooth and creamy. Gradually add the remaining ¾ cup sugar, continuing to beat for a velvety texture. Next, incorporate the sour cream and vanilla extract, mixing just until combined. Finally, add the eggs one at a time, mixing gently after each addition to avoid over-beating, which can lead to cracks during baking.
Step 4: Assemble and Bake
Pour the luscious filling over the cooled crust, smoothing the top with a spatula to create an even surface. Lower the oven temperature to 325°F (160°C), then bake the cheesecake for 50 to 60 minutes. You’ll know it’s done when the center is slightly jiggly but not liquidy, ensuring a creamy yet stable interior.
Step 5: Cool and Chill
Once baking is complete, turn off the oven and leave the door slightly open, letting the cheesecake cool slowly for about an hour. This gradual cooling helps prevent cracking while locking in moisture. Afterward, refrigerate the cheesecake for at least 4 hours or preferably overnight—this resting time is crucial for the flavors to meld beautifully.
How to Serve New York-Style Cheesecake: The Creamy Classic You’ll Love Recipe
Garnishes
Keep it classic with a dusting of powdered sugar or a drizzle of rich caramel or chocolate sauce. Fresh berries like strawberries, raspberries, or blueberries add a pop of color and a refreshing tang that perfectly complements the creamy richness. For a touch of elegance, a dollop of whipped cream or a few toasted nuts make stunning finishing touches.
Side Dishes
This cheesecake shines as a dessert centerpiece, but pairing it with a fresh fruit salad or a citrus sorbet can balance the richness and provide contrast in texture and taste. A cup of robust coffee or a mild dessert wine also elevates the experience, enhancing every indulgent bite.
Creative Ways to Present
Try individual mini cheesecakes in ramekins for charming personal servings. Swirling in fruit preserves or folding in chocolate chips before baking adds fun variety. For festive occasions, layer sliced cheesecake with fresh fruit and whipped cream in parfait glasses for eye-catching elegance and layered flavor.
Make Ahead and Storage
Storing Leftovers
Once baked and chilled, cover the cheesecake tightly with plastic wrap or store in an airtight container. Kept in the refrigerator, it remains fresh and delicious for 3-4 days. Proper storage ensures the creamy texture stays intact and that every slice tastes as delightful as the first.
Freezing
If you want to keep your New York-Style Cheesecake: The Creamy Classic You’ll Love Recipe for longer, freezing is a great option. Wrap the cheesecake securely in plastic wrap and then aluminum foil, or use a freezer-safe container. It can be frozen for up to one month without sacrificing taste or texture. Thaw overnight in the refrigerator before serving to maintain that signature creaminess.
Reheating
This cheesecake is best enjoyed chilled, so reheating is generally not recommended. If you prefer your cheesecake slightly warmer, let it sit at room temperature for 20-30 minutes before slicing. This subtle warming unleashes the flavors without compromising the texture.
FAQs
Can I make this cheesecake gluten-free?
Absolutely! Simply substitute regular graham cracker crumbs with gluten-free graham cracker crumbs to maintain that classic crust without the gluten. The rest of the recipe stays the same, delivering the same creamy goodness.
Is there a dairy-free alternative for this cheesecake?
Yes, you can swap the unsalted butter in the crust with coconut oil and use dairy-free cream cheese and sour cream alternatives. This lets you enjoy the New York-Style Cheesecake: The Creamy Classic You’ll Love Recipe while accommodating dietary preferences.
How can I prevent cracks on the cheesecake surface?
To avoid cracks, be careful not to over-mix the batter, bake at the recommended temperature, and cool the cheesecake gradually by leaving the oven door ajar after baking. Slow cooling helps the cheesecake set evenly, preserving that perfect smooth top.
Can I use low-fat cream cheese for a lighter cheesecake?
You can, but keep in mind that full-fat cream cheese contributes significantly to the creamy texture and rich flavor. Low-fat versions may result in a less dense and slightly less smooth cheesecake, but it’s a reasonable swap for a lighter treat.
How long should I refrigerate the cheesecake before serving?
For the best flavor and texture, refrigerate the cheesecake for at least 4 hours, preferably overnight. This chilling time allows the flavors to meld and the filling to firm up beautifully, giving you that iconic creamy classic.
Final Thoughts
There’s truly nothing like savoring a slice of this New York-Style Cheesecake: The Creamy Classic You’ll Love Recipe—it’s comforting, indulgent, and utterly timeless. Whether you’re sharing it with family, serving it at a special occasion, or just treating yourself, this cheesecake promises to delight every palate. So go ahead, gather your ingredients, and get ready to create a dessert that’s destined to become a beloved favorite.
Print
New York-Style Cheesecake: The Creamy Classic You’ll Love Recipe
- Prep Time: 30 minutes
- Cook Time: 1 hour 10 minutes
- Total Time: 5 hours 30 minutes
- Yield: 8 servings
- Category: Dessert
- Method: Baking
- Cuisine: American
Description
This classic New York-Style Cheesecake recipe offers a creamy, dense, and rich dessert that you’ll fall in love with. Featuring a buttery graham cracker crust and a smooth cream cheese filling with hints of vanilla, this cheesecake is perfect for any occasion. The careful baking technique ensures a perfectly set cheesecake with a velvety texture and a slightly jiggly center that’s guaranteed to impress.
Ingredients
Crust
- 1 cup Graham Cracker Crumbs (Substitute with gluten-free graham crackers for a gluten-free option)
- ½ cup Unsalted Butter, melted (Can use coconut oil for a dairy-free version)
- ¼ cup Granulated Sugar (You may substitute with a sugar alternative)
Filling
- 4 packages Full-Fat Cream Cheese (8 oz each) (Neufchâtel cheese can be used for a lighter version)
- 1 cup Full-Fat Sour Cream (Greek yogurt can be used for a lighter alternative)
- ¾ cup Granulated Sugar (Key for a beautiful New York-Style Cheesecake)
- 2 teaspoons Pure Vanilla Extract (Use vanilla bean paste for a more intense flavor)
- 4 large Eggs (Ensure eggs are at room temperature)
Instructions
- Prepare the Crust: Preheat your oven to 350°F (175°C). In a bowl, combine the graham cracker crumbs, melted unsalted butter, and ¼ cup granulated sugar. Mix thoroughly until the mixture is evenly combined and crumbly.
- Press and Bake the Crust: Firmly press the crumb mixture into the bottom of a springform pan to create an even crust layer. Bake the crust in the preheated oven for about 10 minutes, or until it turns lightly golden. Remove from the oven and allow it to cool completely before adding the filling.
- Make the Cheesecake Filling: In a large mixing bowl, beat the softened full-fat cream cheese until it achieves a smooth, creamy texture. Gradually incorporate the remaining ¾ cup of granulated sugar, mixing continuously. Add the full-fat sour cream, pure vanilla extract, and then add the eggs one at a time, mixing just until each is combined to avoid overbeating.
- Assemble and Smooth: Pour the cream cheese filling over the cooled crust in the springform pan. Use a spatula to spread and smooth the top evenly to ensure a consistent bake and beautiful finish.
- Bake the Cheesecake: Lower the oven temperature to 325°F (160°C) and bake the cheesecake for 50 to 60 minutes. The cheesecake is done when the edges are set and the center still has a slight jiggle to it, signifying perfect texture.
- Cool Gradually: Once baking is complete, turn off the oven and slightly open the door. Let the cheesecake cool inside the oven for about one hour. This gradual cooling helps prevent cracks.
- Chill Before Serving: After cooling, refrigerate the cheesecake for at least 4 hours or preferably overnight. This allows the flavors to meld and the texture to fully set for the perfect slice.
Notes
- Use room temperature eggs and cream cheese to ensure a smooth batter without lumps.
- Avoid overmixing after adding eggs to prevent cracks in the cheesecake.
- Letting the cheesecake cool gradually in the oven helps prevent cracking.
- For a dairy-free or lighter variation, substitute ingredients as suggested (coconut oil, Greek yogurt, Neufchâtel cheese).
- Run a knife around the edges after baking and before cooling to prevent cracking during cooling.
- Use a springform pan for easy removal of the cheesecake.
