“`html
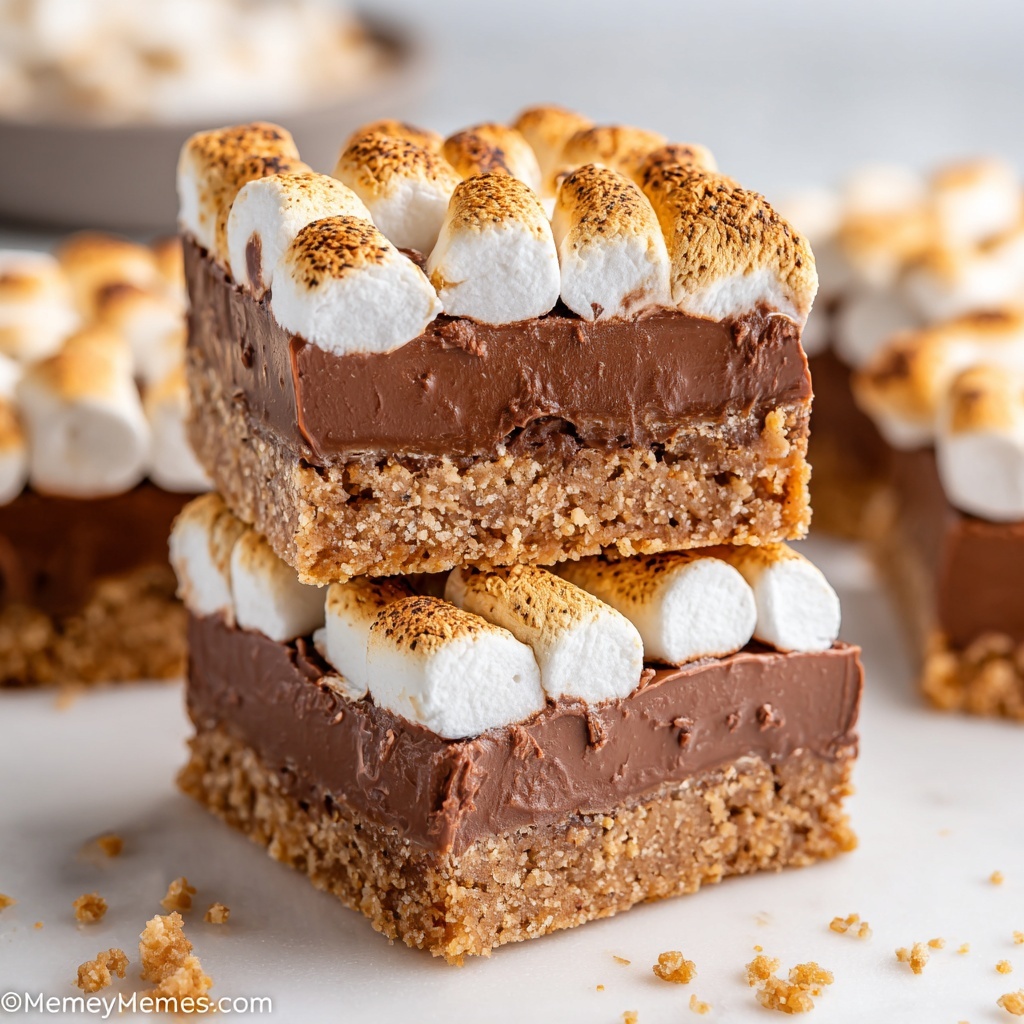
If you’ve ever dreamed of capturing the magic of campfire s’mores without leaving your kitchen, this S’mores Bar Recipe is your new best friend. With layers of buttery graham cracker crust, melted Hershey’s chocolate, and perfectly toasted marshmallows, these bars bring all the nostalgic charm of the classic treat in a fun, easy-to-make dessert that you’ll want to share (or maybe keep all to yourself!). It’s simplicity and indulgence wrapped into one irresistible dish that will have you coming back for seconds.
Ingredients You’ll Need
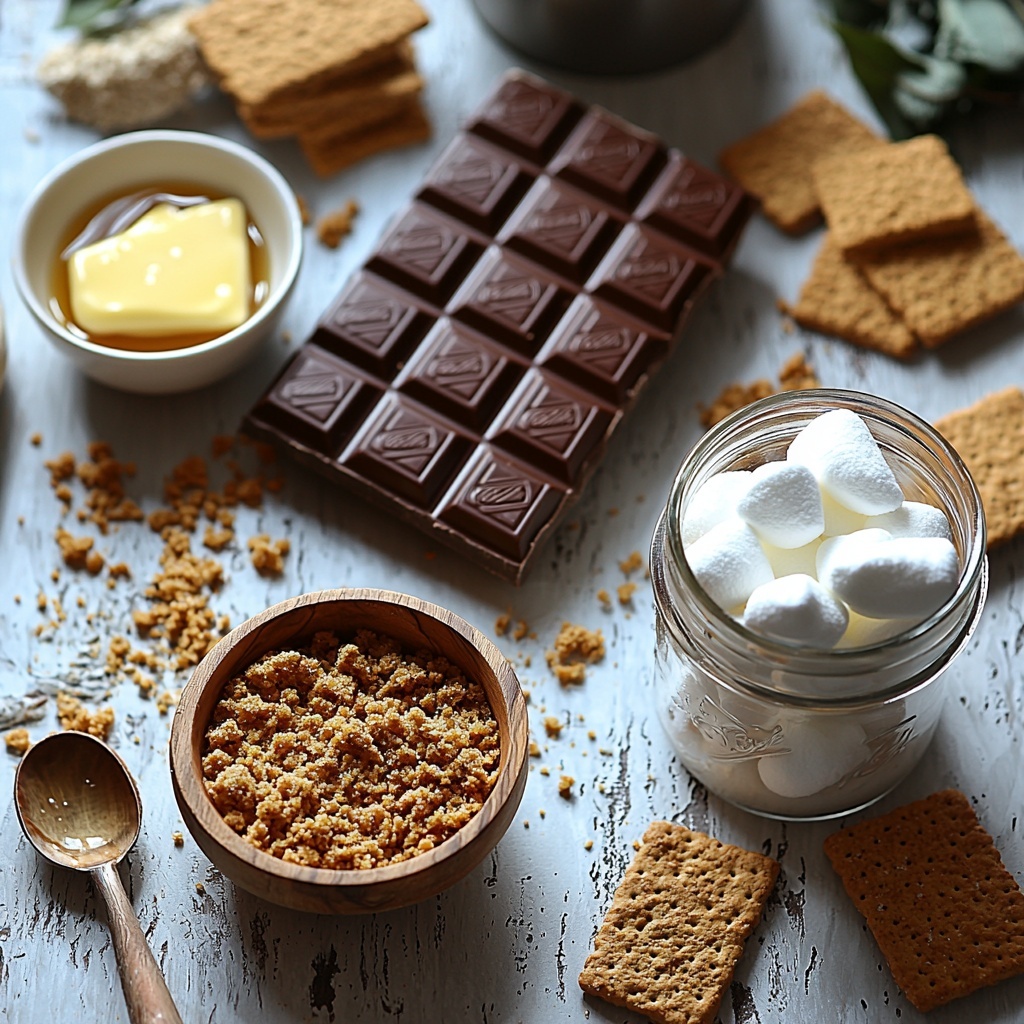
This S’mores Bar Recipe calls for a handful of simple ingredients, each playing a crucial role in building those layers of texture and flavor we love. From the crunchy base to the gooey topping, every component complements one another to create that comforting, melt-in-your-mouth experience.
- 2 Cups graham cracker crumbs: Provides the classic, slightly sweet and crunchy foundation for the crust.
- 8-12 Tablespoons butter (melted): Helps bind the crust together while adding rich flavor and a tender texture.
- 1/2 Cup powdered sugar: Sweetens the crust just enough to balance the chocolate and marshmallows.
- 4 Hershey Chocolate Bars (4.4 ounces each): The iconic milk chocolate layer that melts beautifully over the graham crust.
- 1 package mini marshmallows: Toasted on top for that signature gooey, golden-brown finish.
How to Make S’mores Bar Recipe
Step 1: Prepare Your Pan and Crust
Start by preheating your oven to 350 degrees Fahrenheit and greasing a 9×13-inch baking pan with a non-stick butter spray. In a medium bowl, combine the graham cracker crumbs, powdered sugar, and melted butter. Use a spoon to mix everything until it’s fully incorporated. Then, press this mixture evenly into the bottom and up the sides of your pan, packing it firmly with your fingers. This step is essential for forming a sturdy, golden crust that’ll hold all those yummy layers.
Step 2: Bake the Crust
Pop the crust into the oven for about 5 to 8 minutes. You’re looking for the sides to turn a light golden brown. Just a heads up: the crust will harden as it cools, so don’t worry if it seems a bit soft straight out of the oven. Once baked, remove it and let it cool completely. This sets the stage perfectly for the next layers.
Step 3: Add the Chocolate Layer
Place the Hershey chocolate bars over the cooled crust, covering as much of the graham cracker base as possible. Return the pan to the oven for about 3 minutes—just enough for the chocolate to start melting and get that shiny, inviting look. Then, take it out and let it cool for a minute or two, which helps the chocolate evenly spread and start to set.
Step 4: Top with Marshmallows and Broil
Now for the fun part: scoop the mini marshmallows on top of the warm chocolate layer, packing them tightly side by side. Switch your oven to broil and slide the pan under the heat. Keep an eagle eye on the marshmallows because they only need about 2 minutes to toast to golden perfection. Every oven is different, so watch closely to avoid burning. When they start browning beautifully, pull the pan out immediately!
Step 5: Cool and Serve
Let the bars cool completely after their marshmallow makeover. For easier slicing, pop them into the fridge to set further. When ready to serve, warm a sharp knife under hot water, dry it well, and cut through the sticky layers easily. You might want to repeat warming the knife between cuts—sticky marshmallows are deliciously challenging!
How to Serve S’mores Bar Recipe
Garnishes
While these bars are a showstopper on their own, try sprinkling a pinch of crushed graham crackers or a drizzle of caramel sauce on top for a little extra flair. Fresh berries or a dusting of powdered sugar can add a pop of color that makes serving even more fun and festive.
Side Dishes
If you’re looking to complete your dessert spread, a scoop of vanilla bean ice cream or a dollop of whipped cream pairs beautifully with the warm, gooey s’mores bars. A cup of freshly brewed coffee or hot chocolate also complements the flavors perfectly for an indulgent treat time.
Creative Ways to Present
For a special occasion, serve your S’mores Bar Recipe on a rustic wooden board or individual plates with cute striped straws and little marshmallow skewers on the side. If you want to get playful, mini versions in cupcake liners work great for parties and make portion control a breeze.
Make Ahead and Storage
Storing Leftovers
Leftover s’mores bars keep wonderfully in an airtight container in the refrigerator for 3 to 4 days. Keeping them chilled helps maintain the marshmallows’ structure and makes slicing less sticky.
Freezing
If you want to save some for later, these bars freeze well. Wrap each piece tightly in plastic wrap and store them in a freezer-safe container for up to 1 month. When you’re ready to enjoy, just thaw them in the fridge overnight.
Reheating
To bring back that just-broiled marshmallow magic, briefly warm bars in the oven at 300 degrees Fahrenheit for about 5 minutes. Alternatively, a quick zap in the microwave for 10 to 15 seconds revives that gooey texture, but watch it carefully to avoid overheating.
FAQs
Can I use regular-sized marshmallows instead of mini ones?
Absolutely! If you use regular marshmallows, consider cutting them in half to help them toast evenly and fit nicely over the chocolate layer without overpowering the bars.
What if I don’t have graham cracker crumbs?
You can crush whole graham crackers in a sealed bag with a rolling pin or pulse them in a food processor. Just make sure they’re finely crushed so the crust holds together nicely.
Why do the marshmallows burn so easily under the broiler?
The broiler is very intense and marshmallows toast quickly because of their sugar content. Staying close and watching them like a hawk helps you catch them at the perfect golden-brown moment before they char.
Can I make this recipe gluten-free?
Yes! Use gluten-free graham cracker crumbs and check that your chocolate and marshmallows have no gluten-containing ingredients. The rest stays the same, and you’ll still get that fantastic flavor.
Is it okay if the chocolate doesn’t fully melt? Will the bars still taste good?
Definitely! A partially melted chocolate layer still tastes amazing and adds a nice mix of textures. The marshmallows on top bring enough gooeyness to balance it all out.
Final Thoughts
This S’mores Bar Recipe is such a joyful way to bring a classic favorite into your home with zero campfire required. It’s straightforward, fun, and absolutely delicious, perfect for sharing with friends, family, or simply indulging yourself. So grab your ingredients, preheat that oven, and treat yourself to a little chocolate-and-marshmallow heaven—you won’t regret it!
“`
Print
S’mores Bar Recipe
- Prep Time: 10 minutes
- Cook Time: 15 minutes
- Total Time: 25 minutes
- Yield: 16 servings
- Category: Dessert
- Method: Baking
- Cuisine: American
Description
Delicious and easy-to-make S’mores Bars featuring a buttery graham cracker crust, melted Hershey’s chocolate, and toasted mini marshmallows. Perfect for a nostalgic treat that captures the classic campfire taste in a convenient baked dessert bar.
Ingredients
Crust
- 2 Cups graham cracker crumbs
- 8–12 Tablespoons melted butter
- 1/2 Cup powdered sugar
Filling and Topping
- 4 Hershey Chocolate Bars (4.4 oz each)
- 1 package mini marshmallows
Instructions
- Preheat Oven: Preheat your oven to 350°F (175°C) to get it ready for baking the crust.
- Prepare Pan: Grease a 9×13-inch baking pan with non-stick butter spray to prevent sticking.
- Mix Crust Ingredients: In a medium bowl, combine graham cracker crumbs, powdered sugar, and melted butter. Stir with a spoon until the mixture is well combined.
- Press Mixture into Pan: Evenly distribute the graham cracker mixture in the baking pan and press down firmly with your fingers to pack it tightly along the bottom and sides.
- Bake Crust: Bake the crust in the oven for 5-8 minutes until the edges start to turn golden brown. The crust will harden as it cools.
- Cool Crust: Remove the pan from the oven and let the crust cool completely before layering on the chocolate.
- Layer Chocolate: Arrange the Hershey bars evenly over the cooled crust, covering as much of the graham cracker base as possible.
- Melt Chocolate: Place the pan back in the oven for about 3 minutes until the chocolate begins to melt and turns shiny.
- Cool Slightly: Let the pan cool for 1-2 minutes after removing from the oven.
- Add Marshmallows: Place the mini marshmallows closely packed on top of the melted chocolate layer.
- Broil Marshmallows: Turn the oven to broil. Place the pan in the oven and watch carefully. Broil the marshmallows for about 2 minutes until they brown lightly. Be vigilant to prevent burning.
- Final Cooling: Remove from the oven and let the bars cool completely. Optionally, refrigerate to set the bars and make them easier to cut.
- Serve: Using a warm, sharp knife (warm under hot water, dry, then slice), cut the bars and serve. Repeat warming the knife if it becomes sticky.
Notes
- The crust hardens as it cools, so it’s important not to skip that step before adding chocolate.
- Watch the marshmallows carefully while broiling as they can burn quickly and even ignite.
- Warming the knife before slicing helps prevent sticky cuts.
- Refrigerating after cooling helps bars set and makes slicing easier.
- The amount of butter can be adjusted between 8 to 12 tablespoons depending on desired crust firmness.


