
“`html
There is something incredibly joyful about combining creamy cheesecake with a delightful crunch wrapped inside a crunchy cone—this Strawberry Crunch Cheesecake Cones Recipe captures that magic perfectly. Each bite delivers smooth, luscious cheesecake filling balanced by a sweet strawberry-infused cookie crunch, all nestled in a crisp waffle cone, making it an irresistible treat whether you are entertaining guests or just craving a fun and festive dessert. This recipe brings together simple ingredients in a playful way that will quickly turn into a favorite summer indulgence.
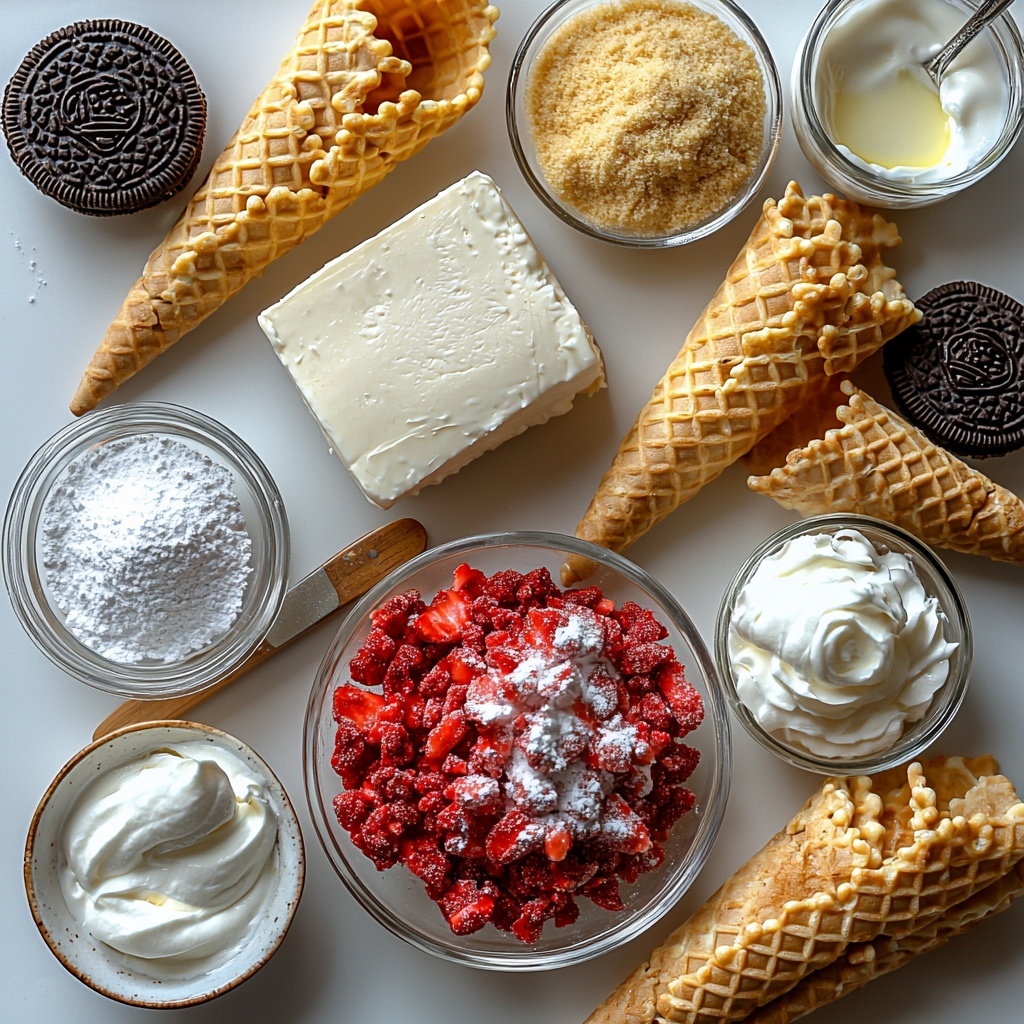
Ingredients You’ll Need
These ingredients are wonderfully simple yet essential for building the layers of flavor and texture that make this dessert shine. From the rich cream cheese to the vibrant strawberry crunch, each component plays a delicious role.
- 8 oz cream cheese, softened: The creamy base that provides richness and smoothness to the cheesecake filling.
- 1/2 cup powdered sugar: Adds sweetness without graininess, helping the filling remain silky.
- 1 teaspoon vanilla extract: Enhances the cheesecake’s depth with a warm, fragrant note.
- 1/2 cup heavy whipping cream (chilled): Whipped into stiff peaks, it lightens the filling for that perfect fluffy texture.
- 1/4 cup sour cream (optional): Brings a subtle tang that brightens up the overall flavor profile.
- 1 cup Golden Oreos (or similar vanilla sandwich cookies), crushed: Provides the sweet and crunchy base for the topping.
- 1/2 cup freeze-dried strawberries, crushed into powder (or strawberry gelatin powder): Adds vibrant strawberry flavor and a beautiful pop of color.
- 1/4 cup melted butter: Binds the cookie crumbs and strawberry powder together to create a crisp topping.
- 2 tablespoons granulated sugar (optional): A touch of extra sweetness for those who prefer it.
- 8-10 waffle cones (or sugar cones): The crunchy vessel that holds all the delicious layers.
How to Make Strawberry Crunch Cheesecake Cones Recipe
Step 1: Make the Cheesecake Filling
Start by beating the softened cream cheese with powdered sugar and vanilla extract until the mixture is impressively smooth and creamy—this is the heart of your filling. In a separate bowl, whip the chilled heavy cream into stiff peaks to add airiness, then gently fold the whipped cream into the cream cheese mixture. For an extra zing, stir in sour cream which gives your filling a little tang and complexity. Once combined, the filling should be luxuriously thick yet light, so pop it into the fridge to chill while you prepare the topping.
Step 2: Prepare the Strawberry Crunch Topping
Next, crush the Golden Oreos into fine crumbs. You can use a food processor for quick results or a rolling pin and a zip-top bag for a hands-on approach. Add in the freeze-dried strawberries, crushing them further until you have a powder that bursts with strawberry flavor—if you have strawberry gelatin powder, feel free to use that instead for convenience. Combine these with melted butter until the crumbs are well coated, which will help your topping stay crunchy and buttery. Sprinkle in granulated sugar if you prefer a sweeter crunch, then set this mixture aside.
Step 3: Assemble the Cones
With your cheesecake filling chilled and your topping ready, carefully scoop or pipe the filling into each waffle cone, making sure not to overfill so there’s room at the top for that irresistible crunchy layer. Dip or press the cone openings into your strawberry crunch mixture, coating the top generously with those delicious crumbs. This step adds the perfect textural contrast and that pretty pop of pink color that makes these cones so inviting.
Step 4: Chill and Serve
Place your filled and coated cones upright in the refrigerator for 30 minutes to 1 hour. This chilling step firms up the filling so it holds its shape when you serve. If you’re feeling fancy, consider drizzling a bit of strawberry syrup or chocolate sauce over the cones just before serving for extra flair and to wow your guests even more.
How to Serve Strawberry Crunch Cheesecake Cones Recipe
Garnishes
Fresh strawberries on top add a pop of natural sweetness and vibrant color that elevates the look and flavor. For extra whimsy and texture, sprinkle some more strawberry crunch or graham cracker crumbs over the cones. A cloud of whipped cream adds a fluffy contrast that everyone adores. These simple garnishes take your dessert from delicious to absolutely stunning.
Side Dishes
Pair these cheesecake cones with light, refreshing sides like a chilled fruit salad or a crisp mint-infused lemonade for a summery spread. If you want to stay in dessert mode, mini chocolate fondue bites or a scoop of berry sorbet complement the cones wonderfully with complementary flavors and textures.
Creative Ways to Present
Try arranging the cones standing tall in a rustic wooden box filled with some decorative shredded paper or edible flowers for a garden party vibe. Alternatively, serve them in a pretty cone holder or line them up on a colorful platter for a playful and inviting presentation. You can even customize the crunch topping with different freeze-dried berries or sprinkle edible glitter for special occasions.
Make Ahead and Storage
Storing Leftovers
If you have any leftover Strawberry Crunch Cheesecake Cones, store them in an airtight container in the refrigerator for 3-4 days. This keeps the cheesecake filling fresh and the cones retain their crunchiness as much as possible. Just be sure to enjoy them within this window for the best flavor and texture.
Freezing
While freezing is possible, it’s not highly recommended as the cones can become soggy and lose their crunch upon thawing. If you must freeze, wrap each cone tightly in plastic wrap and place in a freezer-safe container for up to a month. Thaw overnight in the refrigerator to minimize texture loss, but keep in mind the quality might not be as perfect as fresh.
Reheating
Reheating is not advisable for this dessert, as the cheesecake filling is best enjoyed chilled and the cone is meant to stay crisp. For the best experience, serve the cones directly from the refrigerator after chilling.
FAQs
Can I use sugar cones instead of waffle cones?
Absolutely! Sugar cones work wonderfully and will give your Strawberry Crunch Cheesecake Cones Recipe a slightly sweeter crunch. Both cone types are delicious, so it just depends on your texture and sweetness preference.
Can I prepare the cheesecake filling in advance?
Yes, you can make the cheesecake filling up to a day in advance and keep it refrigerated. This helps the flavors meld and makes assembly quick and easy when you’re ready to serve.
What can I substitute for freeze-dried strawberries?
If freeze-dried strawberries aren’t available, strawberry gelatin powder is a great alternative that still delivers that bright flavor and color. You could also experiment with other freeze-dried berries for a fun twist.
Is it okay to add sour cream to the filling?
Adding sour cream is optional but recommended if you enjoy a subtle tang to balance the sweetness. It also adds a lovely creaminess that enhances the overall flavor of the cheesecake filling.
How do I prevent the cones from getting soggy?
Make sure to assemble the cones shortly before serving and keep them chilled. The melted butter in the topping helps create a protective barrier, but to avoid sogginess, don’t fill and coat the cones too far in advance.
Final Thoughts
This Strawberry Crunch Cheesecake Cones Recipe is such a joyful way to bring together creamy, crunchy, and fruity flavors in one adorable package. Whether you’re planning a backyard gathering or just want to treat yourself to a fun dessert, these cones are sure to delight everyone’s taste buds and bring smiles all around. Give this recipe a try and watch your friends and family rave about how delicious and unique this treat is!
“`
Print
Strawberry Crunch Cheesecake Cones Recipe
- Prep Time: 20 minutes
- Cook Time: 0 minutes
- Total Time: 50 minutes (including chilling time)
- Yield: 8-10 cheesecake cones
- Category: Dessert
- Method: No-Cook
- Cuisine: American
- Diet: Vegetarian
Description
Strawberry Crunch Cheesecake Cones are a delightful bite-sized dessert that marries creamy cheesecake filling with a crunchy strawberry cookie topping, all served in a crisp waffle cone. Perfect for summer gatherings or parties, this no-bake treat is easy to prepare, visually appealing, and deliciously satisfying.
Ingredients
For the Cheesecake Filling:
- 8 oz cream cheese, softened
- 1/2 cup powdered sugar
- 1 teaspoon vanilla extract
- 1/2 cup heavy whipping cream (chilled)
- 1/4 cup sour cream (optional, for extra tanginess)
For the Strawberry Crunch Topping:
- 1 cup Golden Oreos (or similar vanilla sandwich cookies), crushed
- 1/2 cup freeze-dried strawberries, crushed into powder (or strawberry gelatin powder)
- 1/4 cup melted butter
- 2 tablespoons granulated sugar (optional)
For the Cones:
- 8–10 waffle cones (or sugar cones)
Instructions
- Make the cheesecake filling: In a large bowl, beat the softened cream cheese with the powdered sugar and vanilla extract until smooth and creamy. In a separate bowl, whip the heavy cream until stiff peaks form. Gently fold the whipped cream into the cream cheese mixture. Add the sour cream if you want a little tangy flavor. Once combined, the filling should be thick and creamy. Refrigerate while preparing topping.
- Prepare the strawberry crunch topping: Crush the Golden Oreos into fine crumbs using a food processor or rolling pin. Add freeze-dried strawberries and crush further until powdery or finely chopped; if using strawberry gelatin powder, add directly. Mix crumbs and strawberries with melted butter until coated. Optionally add sugar for extra sweetness.
- Assemble the cones: Carefully scoop or pipe the cheesecake filling into waffle cones, leaving some space at the top. Dip or press the cone tops into the strawberry crunch mixture to coat with crunch topping.
- Chill and Serve: Refrigerate the filled cones for 30 minutes to 1 hour to firm up. Optionally drizzle with strawberry syrup or chocolate sauce, and garnish with fresh strawberries, extra crumbs, or whipped cream before serving.
Notes
- You can prepare the cheesecake filling and topping ahead to save time.
- Swap freeze-dried strawberry powder for other fruit powders or graham cracker crumbs for variety.
- Use sugar cones for a sweeter crunch or mini cones for smaller servings.
- For a chocolate twist, add chocolate chips to the cheesecake filling.
- Ensure the whipped cream is well chilled before whipping for best results.


